Katrina Kay Creations

Create Clothes That Fit Your Curves

  • Home
  • Start Here
  • About
  • Blog
  • Contact
  • Videos
You are here: Home / Most Popular / How to Sew Your Skirt Lining to Your Zipper by Sewing Machine

How to Sew Your Skirt Lining to Your Zipper by Sewing Machine

September 19, 2013 by Katrina 17 Comments

sew your skirt lining to your zipper by sewing machine, not by hand

Have you ever wondered how to sew your skirt lining to your zipper by sewing machine instead of by hand?

Every ready-to-wear skirt I have ever purchased has the skirt lining sewn to the zipper by sewing machine. But when you purchase commercial patterns, the instructions tell you to sew the skirt lining to your zipper by hand.

Now, I don’t have a problem with hand stitching-I still hem my skirts by hand, even though I have a blind hemmer (that’s another story). But I like hand stitching only when it’s necessary or when I can’t get the same quality by machine stitching.

I was taught in my sewing class in college that the inside of your garment
should look just as good as the outside of your garment.

I like to copy ready-to-wear techniques because they look good on the outside/inside of the garment and I know they do things in the most efficient way possible. Their time is money, after all. I also know if it doesn’t require a special sewing machine, it can be duplicated.

So if the manufacturer can do it, why can’t you or I?

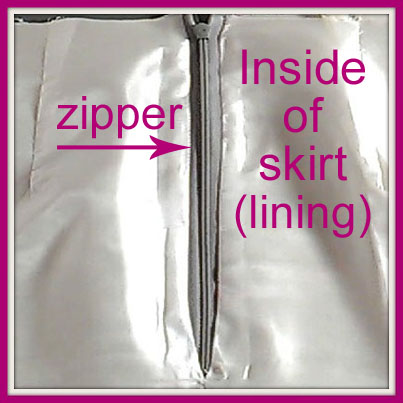
Sewing your skirt lining to your zipper by sewing machine is really not complicated. You may or may not have to use your zipper foot depending on your sewing machine. With my machine I’m able to use my all purpose foot.

If you have any questions, leave them in the comments below.

Have you ever attached your lining to your zipper this way? Which way do you prefer?

You may also like:

  • How to Move a Dart on Your Sewing PatternHow to Move a Dart on Your Sewing Pattern
  • Do You Want to Make Your Own Sewing Patterns?Do You Want to Make Your Own Sewing Patterns?
  • Skirt Pattern: Add to Your Hip, Not Your WaistSkirt Pattern: Add to Your Hip, Not Your Waist
  • How to Make a Pleated Skirt-Part 1How to Make a Pleated Skirt-Part 1

Filed Under: Most Popular, Sewing Tutorials, Tutorials Tagged With: hand stitching, sew lining to zipper by machine, sewing machine, skirt, skirt lining, skirt pattern, zipper

« Plus Size Pattern Alteration: 7 Steps to Your Custom Shoulder Slope
How to Sew a Waistband that Will Never Roll or Wrinkle »

Comments

  1. Any Mouse says

    May 14, 2018 at 11:58 am

    Thank you! Especially the tip about going an inch BELOW the zipper end!

    Reply
    • Katrina says

      May 14, 2018 at 7:09 pm

      You’re so welcome, Any Mouse.

      Reply
  2. Myra says

    December 26, 2016 at 2:21 pm

    Thank you Katrina. Excellent tutorial and very easy to understand. So glad I subscribed to your site. Question: can you use this same zipper technique with a regular zipper. Thank you.

    Reply
    • Katrina says

      December 26, 2016 at 11:50 pm

      Hi Myra, I’m glad you found this tutorial easy to understand. In answer to your question, yes you can sew the lining to the zipper using a regular zipper, but your seam allowance wouldn’t be as free because of the topstitching, like for a centered zipper insertion.

      I found a tutorial to show you what a I mean here: https://www.youtube.com/watch?v=EwXuI-uv5UU. It can be done, just a little more challenging but certainly not impossible.

      Quick tip: try topstitching 1/4″ from the zipper instead of the standard 3/8″ for a centered zipper. This will give you an extra 1/8″ of an inch to work with when applying the lining, which might make it a little easier to catch the zipper tape with your stitching.

      Reply
  3. Sandy Kiser says

    October 16, 2016 at 4:47 pm

    This is an awesome video. Your instructions are so clear!

    Reply
    • Katrina says

      October 18, 2016 at 10:32 am

      Thank you, Sandy. I’m glad it was easy to undertand. Thanks for watching.

      Reply
  4. Jeanna says

    March 26, 2016 at 9:36 am

    Excellent, Thank you!!

    Reply
    • Katrina says

      March 31, 2016 at 1:24 am

      You’re welcome, Jeanna. Thanks for stopping by and taking the time to comment.

      Reply
  5. C. Diane Johnson says

    December 29, 2013 at 8:57 am

    great video

    Reply
    • Katrina says

      December 30, 2013 at 3:14 pm

      Thank you.

      Reply
  6. Cathy says

    November 28, 2013 at 10:50 am

    Shouldn’t the lining seam allowances be bigger so you don’t end up with too much fabric in the back of the skirt lining?

    Reply
    • Katrina says

      November 28, 2013 at 6:06 pm

      The lining seam allowances are smaller because they’re sewn about 1/4″ away from the zipper teeth. This makes them line up with the edge of the zipper tape. This doesn’t affect the fabric of the skirt because the zipper is sewn to the skirt first, then the lining is sewn.

      I hope I’ve answered your question, Cathy. If not, please let me know.

      Reply
  7. Anne says

    September 24, 2013 at 12:33 pm

    Thank you for sharing this!! I avoid hand sewing whenever possible, 🙂 I’ve got a Craft Gossip post scheduled for later this evening that links to your tutorial:
    http://sewing.craftgossip.com/video-tutorial-stitch-a-zipper-to-your-skirt-lining-by-machine/2013/09/24/
    –Anne

    Reply
    • Katrina says

      September 24, 2013 at 8:29 pm

      Avoiding hand stitching-yes that’s me too. You’re welcome Anne and thank YOU!

      Reply

Trackbacks

  1. Skirt Lining - Skirt Fashion says:
    September 5, 2016 at 12:17 pm

    […] How to Sew Your Skirt Lining to Your Zipper by Sewing Machine […]

    Reply
  2. Video tutorial: Stitch a zipper to your skirt lining by machine | Sewing Patterns says:
    September 25, 2013 at 11:27 am

    […] When you install a zipper into a lined skirt, the pattern instructions usually call for stitching the zipper to the lining by hand.  But that doesn’t you have to do it that way!  Katrina from Katrina Kay Creations shows how to stitch a zipper to the lining of a skirt using your sewing machine instead.  It’s a video tutorial, so you can watch along as she does it.  Go to Katrina Kay Creations for the video . […]

    Reply
  3. Video tutorial: Stitch a zipper to your skirt lining by machine · Sewing | CraftGossip.com says:
    September 24, 2013 at 7:51 pm

    […] When you install a zipper into a lined skirt, the pattern instructions usually call for stitching the zipper to the lining by hand.  But that doesn’t you have to do it that way!  Katrina from Katrina Kay Creations shows how to stitch a zipper to the lining of a skirt using your sewing machine instead.  It’s a video tutorial, so you can watch along as she does it.  Go to Katrina Kay Creations for the video . […]

    Reply

Leave a Reply Cancel reply

Your email address will not be published. Required fields are marked *

This site uses Akismet to reduce spam. Learn how your comment data is processed.

FREE Guide

Click here to subscribe

Connect With Me

  • Email
  • Facebook
  • Pinterest
  • YouTube

About

KKC About Photo Are you tired of spending more time altering & fixing patterns than actually sewing? Or spending money on clothes that don't fit your curves? Then you've come to the right place. Here's what I want for you... READ MORE...

Most Popular

10 sewing mistakes tn | katrinakaycreations.com

10 Sewing Mistakes That Will Make Your Clothes Look Homemade

Don't have a dress form or a friend to help you fit the clothes you sew? This post gives you 7 ways to make fitting your muslin (or the clothes you sew) easier. So don't let solo fitting stop you from sewing your own clothes. Read the blog post or pin to save for later.

7 Ways to Make Solo Fitting Easier

How to Sew a Waistband that Will Never Roll or Wrinkle

How to Sew Your Skirt Lining to Your Zipper by Sewing Machine

draft your own sloper tn | katrinakaycreations.com

Custom Plus Size Top Pattern: Free Resource for Drafting Your Own

Recent Posts

Recently, I had to fix a gaping neckline on my pattern. I’m always reluctant to mess with my neckline because I don’t want my shoulders or armholes to be affected. So this time I decided to take the excess from both my front and my back neckline. Today, I’m going to show you how to make a gaping neckline pattern adjustment on the front and back neckline.

How To Make A Gaping Neckline Pattern Adjustment

Lengthen or shorten pattern alterations are some of the easiest to do. They should also be the first alteration you do, before you make any changes to the width of your pattern. Lengthen/shorten lines are the best place to change the length of your pattern.

How To Change The Length Of Your Top Pattern

Sewing pattern instructions have a lot of information in them. While the amount of information can be overwhelming, the pattern instructions are there to help you through the process of sewing that particular pattern. On the blog, I go through each part of the pattern instructions (10 areas to be exact) and explain them.

Sewing Pattern Instructions: 10 Things You Need To Know

Sewing Pattern Envelope | Read Sewing Pattern Envelope | How To Read Sewing Pattern Envelope |

Sewing Pattern Envelope: 11 Things You Need To Know

Seam Guides | How To Sew With A Seam Guide | Magnetic Seam Guide | Nancy Notions' 6 in 1 Stick 'N Stitch Seam Guide | This blog post will show you how to use seam guides to help you sew straight and curved seams.

4 Seam Guides That Will Help You Sew Seams Right

Privacy

  • Privacy Policy

Terms

  • Terms of Use

Disclaimer

  • Disclaimer

Copyright © 2021 · Tasteful theme by Restored 316