 Yes, knowing how to calculate the wearing ease for a better fitting plus size pattern is necessary. Why, you ask? Because pattern companies put extra wearing ease in their patterns so that they will fit a wide range of women who are the same size. They know that every woman who is a size 20W does not have the same shape or build, so the extra ease is added to allow for any alterations that need to be made.
***Note*** This is mainly for woven fabrics. Knit fabrics are totally different because they stretch, so little to no ease is needed.
What is wearing ease? Simplicity Patterns defines wearing ease as the difference between your body measurement and the finished garment measurement at the same body part. Wearing ease is what allows you to move in your clothes without splitting your seams.
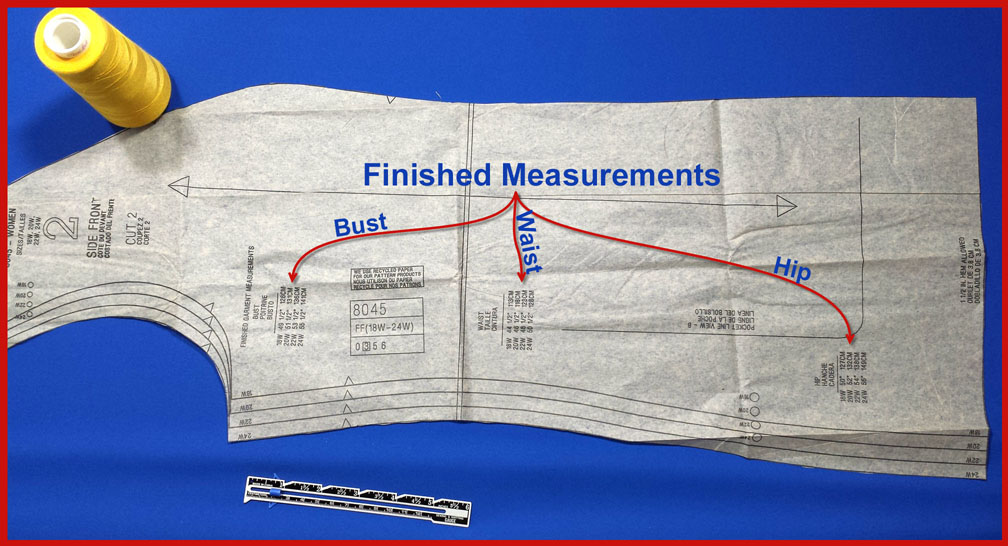
Finished garment measurements are what your garment measures at the bust, waist and hip when it is sewn together without any changes to the pattern.
You determine what amount of wearing ease you need in your garment to feel comfortable, no one can determine that for you.
When you have more wearing ease in your pattern than you want or need, it creates additional fitting problems for you. How?
- It makes your garment too big for your body, which masks or covers up any other fitting problems your garment may have.
- Not removing excess wearing ease before making your garment from muslin or your fashion fabric causes you extra work. Either you have to create another fitting muslin just to make sure it’s comfortable and fits the way you want it to, or you have to make alterations to it after it’s sewn in your fashion fabric.
These problems can be eliminated by calculating how much wearing ease is in your plus size pattern, how much you actually want and how much you need to remove or, in some cases, add. You have to add ease to your pattern if you prefer more moving room than the pattern provides.
Where are the Finished Garment Measurements Listed?
The finished garment measurements are listed on the front pattern piece, regardless of the garment type. If your pattern has a center front and a side front, the finished garment measurements are usually listed on the side front pattern piece.
What specific finished garment measurements are included on the front pattern piece?
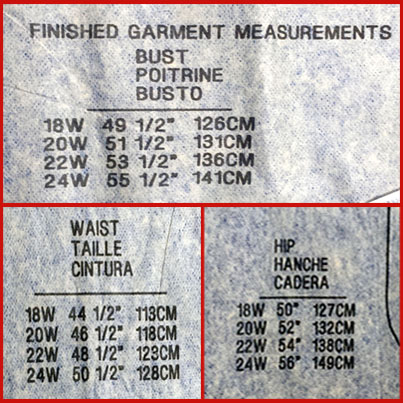
The specific finished measurements on the front pattern piece are:
- Bust
- Waist
- Hip
The finished measurement is listed for each size included in your pattern.
Here’s the Formula For Calculating Wearing Ease
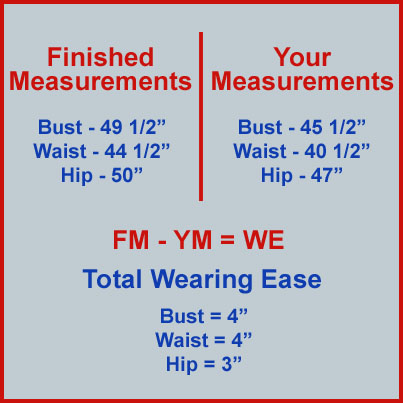
The finished garment measurement (FM) – your body measurement (YM) = wearing ease (WE)
OR
FM – YM = WE
Below is an example using the size 18W finished measurements from my pattern piece above.
Now, let’s say for the sake of example, you only want 2″ wearing ease in your bust, waist and hip. You would then need to remove the following:
- Bust: -2″
- Waist: -2″
- Hip: – 1″
You would remove the excess ease just like you would remove any extra inches. From the side seam of your bust and waist you would take out 1/2″ (2″ divided by 4) and from the hip you would take out 1/4″ (1″ divided by 4).
If you have any questions, please leave a comment below. I didn’t do a video on this but if you would like me to, let me know in the comments also.


Thank you so much, this was exactly what I needed to know (and, by chance, the size example you gave of 18W is pretty much my size, so I didn’t even have to recalculate). Brilliant!
You’re welcome, Jill. I’m glad this information on ease helped you.
Katrina,
Well written article and very helpful. I am learning to sew from body measurements instead of a patterns. Your work is much appreciated!
Catherine
Thank you, Catherine. I appreciate your support.
Good day Katrina, I read a lot about your tutorial it really helpful, please my question is; how i calculate bust to waist and hip to bust measurement?
I’m not quite sure what you’re asking, but you can tie a piece of elastic around the fullest part of your bust and around the fullest part of your hip. Then measure from the fullest part of your bust to your waist and measure from your waist to the fullest part of your hip.
Hi Katrina! Thanks for the definition of wearing ease. I have the hardest time with making full bust adjustments. For example, I know how to determine if I need the FBA by subtracting my full bust from the high bust and the difference of 2 inches or more requires the FBA. My problem is how to determine how much of an FBA I would need. Any resources that you can point me in the direction of for doing proper FBAs other than Real Fit for Real People which is more for tissue fitting?
Hi Tonya, you need to subtract your full bust measurement from the finished bust measurement listed on the front pattern piece. Then determine how much ease you need (I usually add at least 2 inches for ease, but it also depends on the style of the garment). So if your full bust measurement is 40″ and the finished measurement is 36″, but you want 2″ ease, then you would need to add 2″ with your FBA.
40″ – 36″ = 4
Then subtract 2″ for ease: 4″ – 2″ = 2″
Thank you Katrina.
You’re welcome, Tonya.
Hi Katrina this may sound like a silly question but do you have to do a muslin on every garment that you make? I am so unable to find fabric where I live and the second hand shops are a bit of a grey area (although I have used washed bed sheets before, something just puts me off doing this). I did quite a while ago purchase pattern blocks but my body has got older and changed! Will be looking at your class as I have just completed the survey for a discount
Carole
It’s not a silly question at all, Carole. Whenever you’re using a pattern for the first time, I would do a muslin. Once you’ve altered the pattern and it fits the way you want it to, there’s no need for a muslin when using that same pattern over and over again. The only other time I do a muslin is if I change the design of the pattern and I’m not sure how it’s going to look or where a style line will fall on my body.
Using old sheets is ok, especially for fitting purposes. Some people like to wear their muslin if it fits or if they don’t have to do major alterations to it. I use cotton muslin and old, outdated fabric for my muslins so I have no intention of wearing them out in public.
Thank you for completing the survey. I really appreciate it.
Katrina, thank you for all the time you put into teaching us. My question is I’m a size larger than the pattern calls for according to its measurements. For example Vogue I would be a size 24 based on my measurements. there is no size 24 on the actual pattern.So how do I know how much to add to the pattern including ease? Using the Vogue ease chart, my actual waist measurement is 42.5, do I add on for semi fitted jacket 4 3/8 inches? The vogue ease chart suggests 4 3/8 inches to 5 3/4 inches for ease.
Virginia, I would start by looking at the finished measurements for the size 22 to figure out how much to add to make the pattern your size. For example, if the size 22 finished waist measurement is 40.5″, then you know you need to add 2″ plus ease.
You can determine how much ease you want to add by deciding how snug or how loose you want your jacket to fit. If your jacket will be worn over a blouse or top, you’ll need more ease for comfort. Pattern companies always add more ease than the most people need because they’re trying to give a variety of sizes and shapes as much room as possible. You may not need 5″ of ease. To get an idea of how much ease you want/need, try on a jacket you love and wear, pin it so it fits you snug at the bust, waist and hips. Then measure how much you pin out and that’ll be the amount of ease you can start with. Do a test fit to make sure your sewn jacket fits the way you want it to.
Are there standards for the amount of ease that must always be added to a shirt or pair of pants made of a woven fabric?
Thank you for taking time to make this tutorial so very clear and easy to understand. The dynamic illustrations are especially helpful.
Hi Mimi, there are guidelines out there for ease amounts and it also depends on how close fitting or loosely you like to wear your clothing. Vogue Patterns has an ease chart guide here: http://voguepatterns.mccall.com/ease-chart-pages-347.php
What I like about this guide is that it gives you a starting point for ease based on how you like your clothes to fit – close fitting, fitted, semi-fitted , loose fitting, or very loose fitting. Again, this is just a starting point and then you can adjust according to your preference.
I can’t figure out why you divided by 4. Please explain.
Also, the ease you calculated to remove, 1/2″, is that distributed and removed on both bust and waist sideseams as 1/4″ on each sideseam or is it 1/2″ on one seam? Does it matter?
Thank you.
Sunny, I divided by 4 because I needed to remove a TOTAL of 2 inches. 1/2″ times 4 = 2″. So, I need to take 1/2″ from each side seam – 1. left front side seam, 2. right front side seam, 3. left back side seam and 4. right back side seam. This will give me a total of 2 inches.
Of course, most front and back pattern pieces are either cut on the fold or cut 2. The pattern in the picture is CUT 2. This means when I take 1/2″ off the side seams, I’ll have removed a total of 1″ from the front piece and 1″ from the back piece, giving me a total of 2″ inches.
The 1/2″ is removed from EACH side seam at the bust and waist. And 1/4″ (1″ divided by 4) is removed from the side seam at the hip.
I never remove anything from just one seam because this will make your pattern off center. I always distribute evenly.
I hope this didn’t confuse you. If you have any more questions, don’t hesitate to ask.
Thank you for explaining this. I think I finally get it.
You’re welcome, Autumn. I’m glad I could help.
thanks katrina , already read something about Measure simplicity patterns here :
You’re welcome.
Wonderful your work, great, thanks for this, I had a problem with measurements, now, I have solutions… is complete this web for me
I’m glad this was helpful to you, Virma.
Thanks for sharing. I just found you on YT.
You’re welcome, Juanita.