 Are you tired of your waistband rolling and wrinkling under your stomach? Well, let me show you how to sew a waistband that will never roll or wrinkle.
Now, if you don’t have a muffin top, this may not apply to you. I realize that all plus size women are not going to have this problem.
But if you do, then I believe this waistband will solve your problem, just as it did for me.
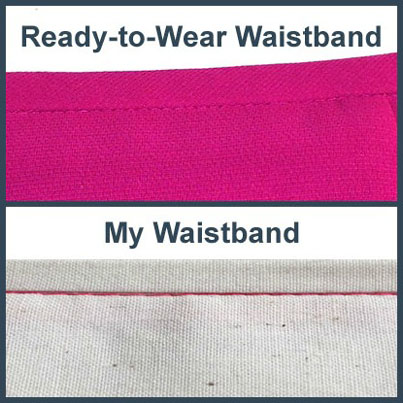
Years ago, I bought one of the most comfortable denim skirts I have ever worn. I wore that skirt until I wore it out. The waistband on that skirt was a 1/2″ tall (Is the correct term tall or wide? I’m not sure) and it was soooo comfortable. But, for some reason it never occurred to me to duplicate that waistband on the skirts I sew myself.
A few years later, I bought 3 skirts from Macy’s (when their plus size clothes were really nice) by Le Suit and noticed the waistband on every skirt was only 3/8″ tall.
It never rolled or wrinkled and was so comfortable, I decided to make all of my skirts with this waistband.
To create this waistband, you can make an easy adjustment to your
commercial pattern, or create your own waistband pattern (I show you how in the video below) so you can keep your original pattern piece for future use or reference.
This waistband is basically sewn like the traditional waistband, but with minor changes. It can be used on skirts and pants that have a back or side zipper. In the video, I use a skirt as an example.
You can also apply the same idea to a casing (I would make it at least 1/2″ tall and use 3/8″ elastic) for an elastic waist.
Let me know in the comments what adjustments you’ve made to your patterns to accommodate your curves and make your clothes more comfortable.
Thank you so very much for your easy to follow teaching.
I could see this kind of no-roll waistband made in a different fabric: color or quality. This is just the one I am going to add to a skirt that has no waistband at all, and doesn’t stay well in place.
Again thank you for this useful tip.
You’re very welcome, Yvette. Thanks for reading and taking the time to comment.
Your video will help me to construct a more comfortable waistband. Your technique, unlike many other sewing tutorials I’ve seen on Pinterest, produces a garment that looks professionally sewn. So many sewers post garments or alterations they’ve made that I’d be embarrassed to say I made. Thank you for showing us an excellent example of sewing know-how, including pressing, which is crucial to the finished product.
It’s very important to me that I present something that I’d be proud to say I made, so thank you Linda, for you kind words and for taking the time to comment.
I can’t wait to try this. Rolling waistbands have always been a problem for me too, but no longer. Awesome video, thank yoy Kay
You’re welcome, Susan. Let me know how this waistband works for you.
I am so glad I sign up for your tutorials. I’ve not sewn in many years and I am just getting back into it and I have learned so much from watchung and reading your tutorials/blogs/sewing library. Thank you so much, I feel more confident getting started again.
I’m so glad to hear that, Connie. I wish you the best as you get back into sewing and I hope you enjoy the journey.
Thank you for your support.
Thank you so much for breaking this down! I figured there had to be something I was missing or I would have been taught how to do this ages ago. Instead I was taught to use an inch and a half waist band, which you know rolls. Instantly! No amount of under layment and top stitching keeps if from wadding up. I stopped making skirts with attached waistbands!
Interestingly, the first time I saw this waistband it was on a skirt to a suit that was custom made for my grandmother. The suit was from the 1940’s and the construction was just exquisite. After a half hour of examining every seam on it, I tried to put it on. The suit fit like a glove. I have never felt so “Professionally Polished” in clothes.
My mom was not so pleased an ordered me out of the suit and refused to let me have the three suits hanging in the closet.
I will beg my sister to find the suits and get pictures of them.
Strange, my sister, mother and grandmother all sew incredibly well. We all have handmade suits. None of them are to the detail of the three in the closet.
Thank you for doing this!
You’re so welcome. I was glad to do it since I’ve been so annoyed with rolling waistbands.
I hope you’re able to get pictures of those suits one day. There’s nothing like a well made suit. It makes you want to remember every detail so you can duplicate it.
Thanks for sharing, Any Mouse!
A great video. Thank you for putting this together for us. It’s a big help!
Thank you again.
Laura
You’re welcome, Laura. I’m glad it was a help to you. Thanks for watching.
Another great video. Thank you for the time and effort you put into sharing your information.
You’re very welcome, Sandy. Thanks again for watching.
Thanks so much. You are such a talented seamstress!
You’re welcome, Kathie. Thanks for saying that and for stopping by and taking the time to comment.
I love your new website! I love hearing your kind voice. We are so blessed that you will share with us. I am not new to the sewing scene, but know that there is always something to be learned. Thanks a lot!
Aww, Iris, you’re welcome, but thank you. I’m glad my voice sounds kind. I never want to sound like a know-it-all or unkind. So that’s good to hear. I love sharing and the reward is when people can actually use the information. We learn from one another and it’s exciting to learn new things. I’m so happy you love the site! Thanks for all your support.
thanks for the time and effort you put in to these lessons to show us how to make our garments look professional.
You’re welcome, Merle. Thanks for stopping by. I really aprreciate it.
Do you have any suggestions for existing pants, such as jeans? I love the jeans except for the rolling waistband.
Jeans might be a little involved because of all the topstitching as well as the way the waistband is sewn on. In some cases it might not even be possible to change the waistband and if it is, it might be costly because of the work involved. And of course, any time you need to wear a belt with your pants, a thinner waistband is not going to work. Sorry Tom, there’s no easy fix for jeans.
Amazing!! I loooooveve it!! you’re a great teacher…Thank you for showing me how to put in a waistband…i hope to sew with the love you expressed in your video.
Thank you, Jody. Sewing is one of my passions, so I’m glad I could help.
This was a very informative video. Explained and demo was clear. thanks for sharing the info.
You’re welcome Retha. Glad I could help.
Love the look of this waistband and fully intend to try it on my next skirt project. However, I do have one question. Do you remove the original seam allowance before applying the waistband? Thank you for the great video!
Hi Darla, I used a 3/8″ seam allowance for the waist and waistband and trimmed the seam to 1/4″ after I sewed the waistband to the skirt.
You could also use a 1/4″ seam allowance for the waist and waistband and then you wouldn’t have to do any trimming after sewing the waistband to the skirt.