 I told you the 3 things you should do to your fabric before you cut. Now that your fabric is ready to be cut, it’s time to lay out pattern pieces. If you want to avoid homemade sewing results, your pattern pieces must be placed on your fabric correctly. If pattern pieces aren’t cut straight, they won’t hang straight on your body either. And there is no alteration that can fix a pattern that isn’t cut properly. Today, I’m going to tell you about 5 areas you should focus on in your pattern layout and cutting that will lead to sewing success.
Lay out pattern pieces – focus on 5 areas:
1. Pressing
Press your tissue pattern pieces before you lay them on your fabric. Your pattern pieces will have creases in them from being folded in an envelope. If you put your iron on a low setting, you can safely press the creases out without damaging your pattern pieces.
For digital patterns, I punch 4 or 5 holes in them at the top of each pattern. I use the same kind of hole puncher used to punch holes in notebook paper. Then I store them on a hanger to avoid creases. I have pressed out creases, also on a low heat, but prefer to avoid them altogether when working with printer paper.
A wrinkled pattern piece is not going to lay as flat as it should on your fabric. It tends to draw up, which can definitely have an effect on the fit of your garment, making it tighter shorter than you’d like. Avoid unnecessary problems by taking the time to press out those wrinkles and creases.
2. Pattern Layout Guide
Follow the layout guide that comes with your pattern. Pattern companies have created the best layout possibilities according to the yardage amount they recommend on the back of your pattern. This is to ensure you get the best results with the most efficient use of your fabric.
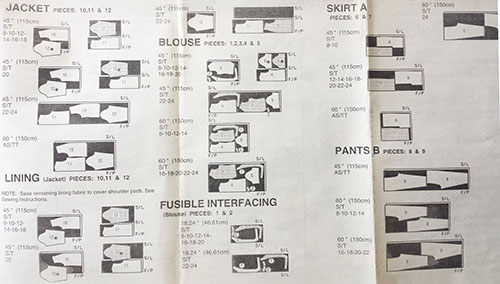
Following the layout guide also includes choosing the right layout for your fabric. Pattern companies try to anticipate the most common layout possibilities needed, according to different fabric types and widths.
The layout will be based on your fabric width and whether or not all your pieces need to lay the same way. For instance, velvet fabric requires a different kind of layout than cotton fabric.
Each layout is categorized by garment, for example, Jacket, Blouse, etc. The layouts are also categorized by separate components of the garment, like lining and interfacing. (See image above.)
To learn more about layouts, go to this Threads Magazine’s article, Pattern Layouts.
The exception to following the pattern layout guide would be if you have a fabric with a print or plaid design that needs to be matched or if you’re doing something different or creative with your fabric. Then you would have to figure out the best layout for your idea.
3. Grainlines
The grainline on your pattern piece is very important. The grainline is there to:
Tell you what direction your pattern piece should be placed on your fabric. Your grain line is always parallel to the selvage. If your pattern piece should be lay lengthwise, crosswise or on the bias, the grainline will tell you (as well as the layout guide).
Aid you in laying your pattern pieces on your fabric as straight as possible. If you cut your fabric and the pattern pieces are not straight, your garment will not hang on your body straight. You may also get diagonal wrinkles across your body and the garment may feel very uncomfortable.
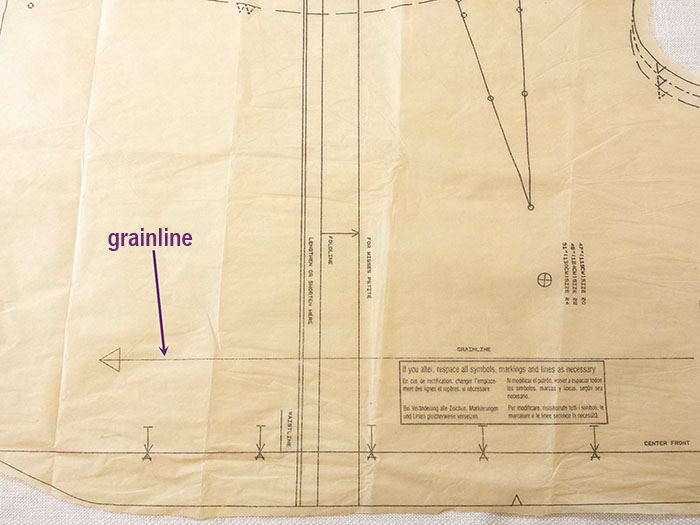
The grainline is the straight line on your pattern piece that’s parallel to your center front or center back.
Once your garment is cut out and the pieces aren’t straight, there is no fixing it. Not even with alterations. Even if you fix, say a crooked hem, your print may still be crooked. If you’re making a skirt, skirt side seams may be pulling to the front or back. If you’re making pants, your pant legs will be twisted around your leg and the garment may still feel uncomfortable.
Making sure your pattern pieces are on your fabric straight before you cut takes a little extra time. But the extra will benefit you by saving you a lot of headaches in your fitting and sewing.
To make sure your pattern pieces are placed on your fabric correctly, follow the guidelines on your pattern pieces themselves.
For instance, if your pattern piece should be placed on the fold, the pattern marking will tell you with a symbol and the words “center fold”. (See below). Using the fold of your fabric will guarantee your pattern piece is straight, providing your fabric is on grain and you followed the other guidelines in this post.
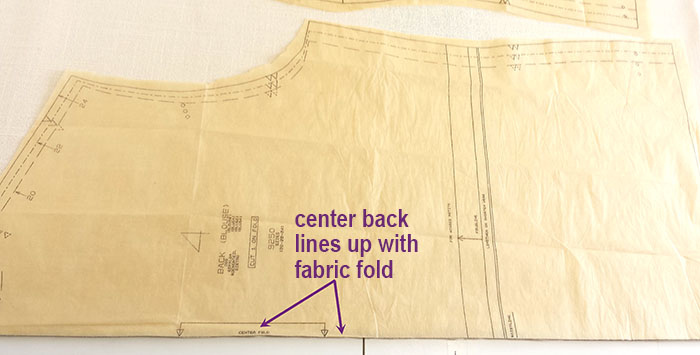
This pattern piece has the “Center Fold” symbol, which is 2 arrows pointing to the center front or center back of the pattern piece. In this image it means the center back is placed direcly on the fold of the fabric.
How to make sure your pattern piece is straight
For pattern pieces not cut on the fold, your piece is straight if the grainline is parallel to the selvage of your fabric. You need to use a tape measure or ruler to measure the distance from the grainline of your piece to the selvage of your fabric.
Pin one end of your grainline and measure its distance from your fabric selvage. It doesn’t matter which end of the grainline you choose to pin first.
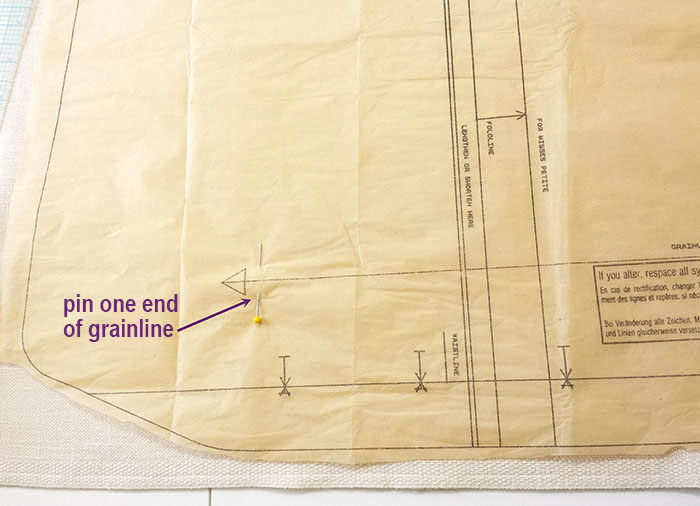
Pinning one end of the grainline allows you to adjust the other end of the grainline as needed.
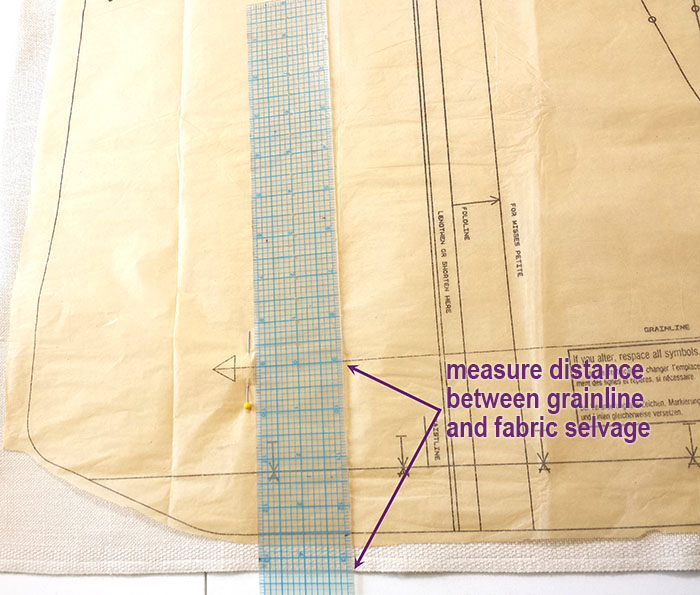
Measuring the distance between your grainline and selvage can also be done with a tape measure.
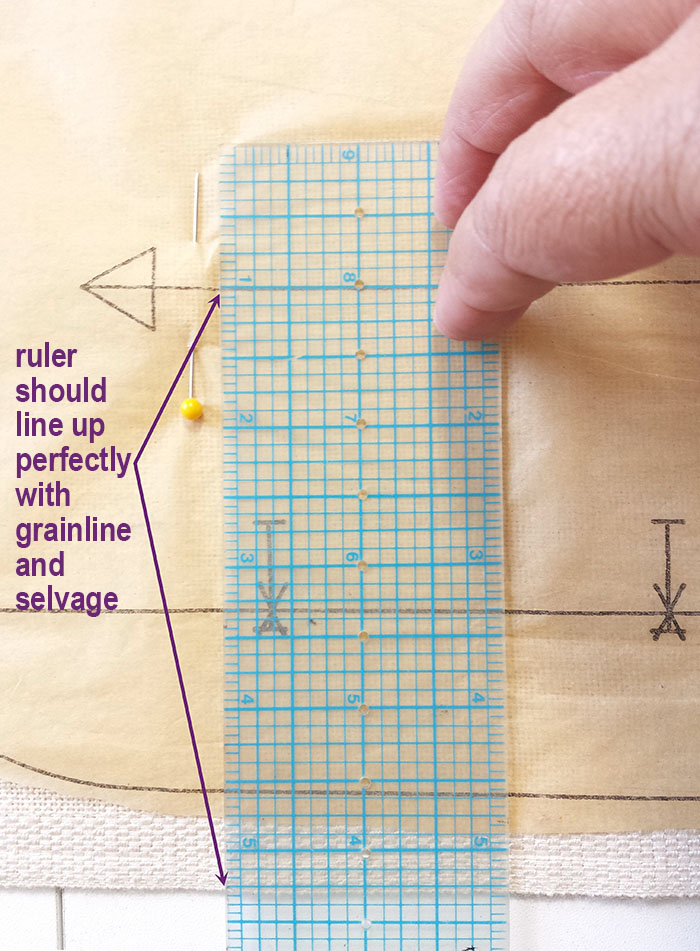
This is a closer look of measuring the distance between your grainline and your fabric selvage.
If your selvage is wavy, find the straightest part you can. You can also line up your selvage with the straight edge of your table or cutting board and measure to the edge of the table or cutting board.
Then measure the distance at the unpinned end of your grainline. If the measurement is different, move the pattern piece until the distance from the selvage is the same at both ends of the grainline.
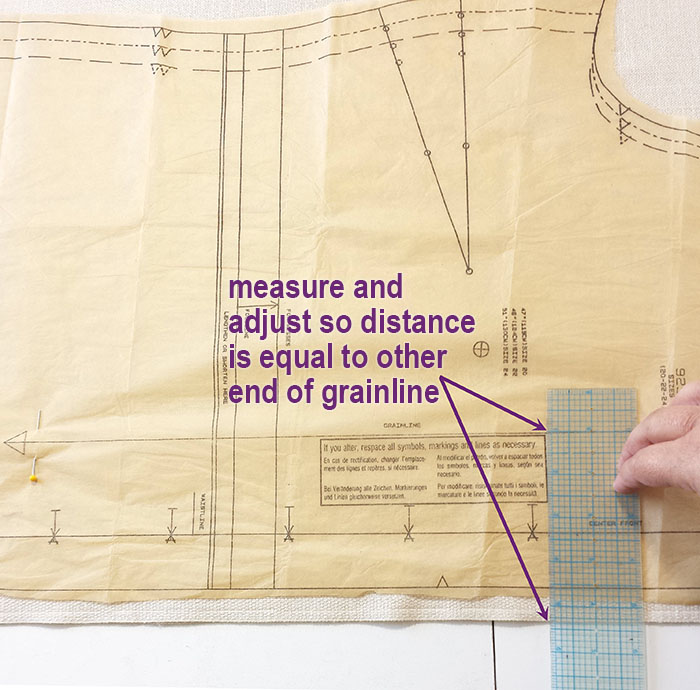
Measure unpinned end of grainline and adjust as needed.
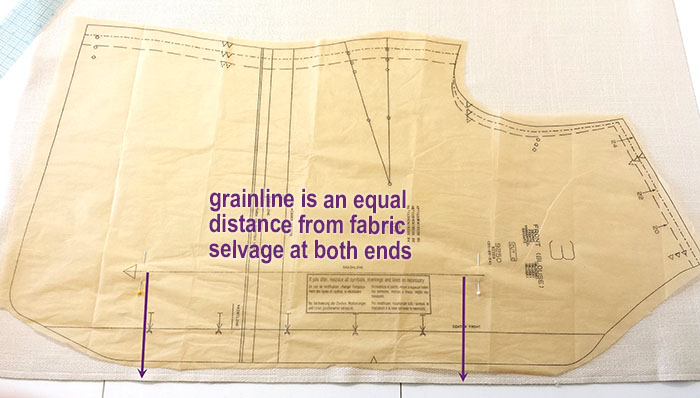
The grainline is now the same distance from the fabric selvage on both ends. Now you can pin the rest of the piece.
Once the piece is straight, you can pin the rest of the piece in place. Or you can pin the grainlines of all your pieces, then pin the rest of all your pieces in place.
When the pieces closest to the selvage are straightened and pinned in place, you can use their grainlines to measure to for neighboring pieces.
4. Cutting
Cutting your fabric with one hand on your pattern piece at all times ensures that it stays in place while you cut. This means that left-handed people will cut their pieces out in clockwise direction and right handed people will cut their pieces out in a counterclockwise direction.

Place one hand on your pattern piece while cutting to prevent shifting or any kind of movement.
It’s especially important to hold your pattern piece in place with one hand while you cut when you use pattern weights instead of pins. Depending on how heavy your weights are, your pattern piece could shift while you cut.
Cutting your pattern piece by lifting it a little or not holding it in place can cause slight movement, which can affect the sewing or fit of your piece.
5. Marking
After checking your grainlines and carefully cutting out your pieces, the last and also an important step is marking them. Every symbol has a purpose and is there to aid you while you sew. They’re used for things like matching seams and dart or pocket placement. It’s also important to mark these symbols BEFORE you remove your pattern pieces.
Go to this post to learn more about marking tools. Look at numbers 4, 5, and 6. You can also watch this video on How to Mark Your Fabric for Sewing, by Professor Pincushion.
If you want your sewing projects to look professionally made, don’t ignore any of these 5 areas when you lay out your pattern pieces:
- Pressing
- Pattern Layout Guide
- Grainlines
- Cutting
- Marking
Is there anything you’d like to add to this list? Share in the comments below.
I tried to follow the link to the Threads website for their pattern layout article, but it appears that they have moved it or otherwise altered the link. You might want to relink it if you have the time.
Hi Katrina
Wondering how to decide which way a pattern piece should lay when I’ve taken a pattern piece from an existing garment. The pattern piece isn’t commercial so I don’t have guides. Specifically I’m wondering about long flows sleeves. I’m assuming the grain should run the length of the sleeve? But I keep second guessing myself.
Typically, it should go from the top of the sleeve to the wrist. You should be able to draw a line perpendicular to it across the bottom of the sleeve cap.
I bumped into this page while looking for solutions to alterations on my plus size customer dress my tailors made. I cam tell u am glued to the page. I am up coming fashion designer I want to specialize in plus sizes .i also want to learn myself so I can guide my tailors I hope I can get thru
Thank u
Thanks for stopping by and taking the time to comment, Emem.
This is such a good post. I love to sew and create but typically despise following a pattern. These simple tips will help! Thanks!
You’re welcome, Leanne. I’m glad it’s a help to you.
I am so glad I found your blog. Your video about balancing patterns is a lifesaver. Thank you. I
You’re welcome, Liz. I’m so glad the balancing video was a help to you.
Katrina, I love your teachings but haven’t seen you much on YouTube lately. Can you show to fold fabric on the cross-grain and how to lay out the pattern on that cross-grain?
Thanks for sharing, I am not a newbie, but the information that you share is AWESOME!!!
Thank you, Juanita. I really appreciate you saying that.
Thanks Katrina for this post. Although I had been trying to pin on the grainline I seemed to have trouble lining up the other end. A light bulb moment seeing your visual – I have been pinning ON the grainline instead of perpendicular to the grainline! An ah ha moment – Thank you!
You’re welcome, Claudia. I totally ignored grainlines when I first started sewing and wasted a lot of fabric, so I’m glad I could help.
Hi Katrina – good basic tips for cutting out patterns. I will add one thing, seeing picturs of your layout. It’s fine to use the selvage as a reference point for placing patterns on a grainline – but DO NOT use or cut out the selvage as part of your pattern, even if it will be hidden in the seam. The selvage is a different weave and tension than the rest of the fabric, and on some garments, it could be a problem .
Thanks for saying that, Primrose. I totally agree. I’ve heard people suggest cutting the selvage as part of your pattern, but I never do and don’t recommend it. And if the selvage is woven really tight and causing ripples or wrinkles in my fabric, I snip it to release some of the tension.
Thank you Katrina. Your articles are always interesting and informative. Thanks for taking the time to teach us. It’s very much appreciated.
You’re so welcome. It’s my pleasure to share what I know about sewing with others.
Thanks sew much for all of these wonderful tips! You are really concerned about us getting it correct! God bless you! Also, could we. see some of your garments you have made? I know they are Beautiful! Happy Sewing!
I really am concerned about you guys getting this sewing thing correct. I want you to avoid all the mistakes you can. You’re going to make some mistakes, but hopefully they’ll be teachable moments that won’t cost you a lot of time or money.
I have a some garments I will show, maybe in future blog posts. I’m working on some new item for this curvy body of mine and I’ll be taking you guys along for the ride, so stay tuned.