 Happy New Year! Welcome to my first blog post of the new year.
Last year one of my blog readers asked me the following question: I am sewing for my mother-in-law that has a waist size of 35 inches and a hip size of 52 inches. I can never get her curves right from one point to the other smoothly. Any tips or suggestions?
Well, after some trial and error attempts with these measurements, I think I have the answer to her question. Or at least a good place to start.
Problem
There is a significant difference (17″) between the waist measurement (35″) and hip measurement (52″), which makes it hard to shape her side seam from the waist to the hip, or her hip depth.
I can see how this is a problem because commercial patterns only allow about an 8 to 10 inch distance between the waist and hip. But when you have a very small waist and larger hips, you need more room to shape your side seam.
Solution
Increase the distance between your waist an hip to match the distance on your body or the body of the person you are sewing for.
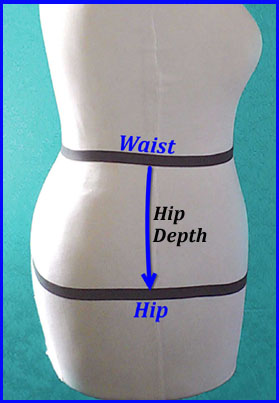
Measuring Tips (click image to enlarge)
If you’re measuring your body, it’s much easier if you get someone to help you with this.
A. Tie a piece of elastic around your natural waistline and your hip line. If you don’t know where your natural waistline is, tie the elastic where you think it is. Then, bend to your right and again to your left. The elastic should roll to your natural waist.
Tie another piece of elastic around the fullest part of your hip. The fullest part is where your butt sticks out the most, for lack of a better way to describe it.
B. Make sure the elastic you tied around your hip is parallel to the floor. It should NOT be pointing toward the ceiling or pointing toward the floor (indicated by the 2 blue arrows in image be).
C. Measure your hip depth, or the distance between the elastic at your waist and the elastic at your hip.
")
In the video below, I show you how to:
- Measure the hip depth on your pattern piece
- Measure the hip depth on your body
- Adjust your pattern piece
A really helpful tutorial. I am a plus and in between size learning to make my own clothes so that I can get items that look nice but still fit. The UK is far behind the US for this. I will be following you on my learning journey for help. Thank you Katrina.
You’re welcome, Sarah. Thank you for reading.
Thanks for this tute. However I have been in pants fitting hell for some time, and cannot figure out what is perhaps the opposite problem to the one you address. That is, my hips are smaller than my belly and for some reason, the sides of the pants are always too long. I pull them up at the waist and the whole crotch fits better. I haven’t found a way to adjust the pattern in a way that raises up the sides. I’m not sure if this adjustment involves the crotch depth or not. Is this problem known as high hip by any chance? I tried to find info on that on the net and mostly it seems to cover one hip being higher than another. Mine are both the same. Going nuts, can you help? Thanks, Peggy
Peggy, It sounds like you hip depth is too long. I would try on the pants again and pin out the excess from the crotch to the side seam. Measure and shorten your hip depth on the lenghten shorten lines provided or draw in your own.
If your fitting problem is a little more complicated than this (It’s hard to tell when I can’t see what your pants look like) this is a good resource for pants fitting solutions: http://bit.ly/2GLIwkL.
Hi Katrina, I would like to make a maxi pencil skirt for my “curvy” daughter. I thought that I could take the simple measurement/calculations like I did for myself (I’m a size 14-16) and cut it out. The first two I made for myself turned out great and was fairly simple. I tried to do the same for her (she’s a size 20-22) and tall. The simple method didn’t work for her. The skirt looked like a potatoe sack. Waist and butt/hip fit ok but the fitting issue was under the butt where there was a lot of open room because her butt is a large curve and less fabric is needed for the back of the legs. I have no idea how to make it fit there and down the legs to the knees? This is a curvy challenge. Any suggestions?
Norma, without seeing your project I’ll do my best giving suggestions. You mentioned you used the simple method of measuring. What measurements did you take?
Does her skirt have a center back (CB) seam? You could shape the CB seam the way you needed to while also tapering the skirt at the side seams would also help. Depending on how much extra room there is, you may not be able to remove it all because she’ll need room to walk.
Hi Katrina,
I have a question, I understand that you need to increase the hip distance to achieve a smoother curve but how does adding the depth not lower the crotch in the pants? I need to make the curve smoother but the pants pattern fits in the drop, if that makes sense? Thanks!
Hi Sandy, did you have to make an adjustment to your pattern? If so, was it to the length or width? I’m just trying to picture why your curve would need smoothing.
This adjustment is only if the distance between your waist and hip is different from your pattern. In the example of my blog reader’s mother-in-law, because her hip measurement was so out of proportion to her waist measurement, it made the length of her hip depth much longer. It sounds like the length of your hip depth is fine.
If you had to adjust the width of your hip measurement by making it smaller or larger and you’re left with a curve that’s not smooth, look at this adjustment on Colette Pattern’s site: https://www.sewalongs.com/clover/clover-wide-or-narrow-hip-adjustments. You may be able to make your curve smooth by making the leg wider or narrower. Let me know if this answers your question.
I am just learning to sew and this video covers a very specific question I’ve run into. I’ve tried making a fitted skirt and I think I did a really good job as far as constructing it, but while it fits my hips nicely it gaps at the waist. The lady whose measurements you’re using is fairly close to my measurements. Unfortunately the instructions that you’re giving aren’t making sense to me. I’m sure it’s due more to my inexperience than your explanation, so I’ll keep watching this video and hopefully it’ll sink in soon.
Tanya, you’re basically making the distance between your waist and hip longer by comparing your measurements to the measurements of your pattern. I hope re-watching the video will help you to make sense of it. If you have any questions, feel free to ask.
Thanks a lot. I did watch it again and suddenly everything clicked. I think that the first time I was just a little too busy and my mind didn’t want to focus on the video right that second. 🙂 This is a lot of help, thanks for posting the video.
Oh good, Tanya. I’m glad to hear that and you’re very welcome.
Hi Katrina. Just finished watching your video on measuring hip depth. I was always measuring from the wrong place! Now I know why my fit was always off ! Thank you. I enjoy all your videos. You teach well.
I’m so glad my video helped you, Carol. Thanks so much for watching. I appreciate your gracious comments.
this video was quite helpful as I am drafting my first plants pattern. My hip depth when seated is different than my hip depth from my waist to my hips and measurement. Do you have any suggestions? Thank you so much.
Hi CJ. For drafting pants, you need your hip depth and your crotch depth. Your hip depth measurement is taken while standing. Your crotch depth measurement is taken while sitting.
Hip depth: measure from your waist to the fullest part of your hip, while standing. This is what I talk about in the video above.
Crotch depth measures from your waist to the hard surface of the chair or table you’re sitting on. That will give you your crotch level when drafting your pants.
You don’t need to measure your hip depth while seated, only while standing.
I hope this helps. I hope you end up with a great fitting pants pattern!
Thank you I like this….I don’t have a butt. I’m flat as a board. All my weight is in front in my stomach. Following these instructions would be the same, is this correct?
Leslie, for the stomach you need to measure the distance between your hip & waist at the center front, side (where the side seam would be) and center back. If you need to add the same amount all the way around, you can use this method. If you need to add a different amount to the front, side or back, then you would need to divide the upper section into 2 parts and move the center front the distance you need, then move the side the distance you need. On the back piece-move the center back, then move the side the same as the side on the front.
I need to do a tutorial on this. This is a good question that others may need the answer to also. Stay tuned.
Awesome look forward to it. Glad I could help. I still can not thank you enough for your site. You showed me how much fun sewing can be. I went on a DIY site and found how to make a Dress Form. It was awesome. 🙂 Every day I am liking my body more and more.
I would love to know what DIY site you found, if you don’t mind sharing. I need to make another dress form for myself and the first DIY method I used wasn’t great.
I’m glad I could put the fun in sewing for you. We should be having a good time when we sew. And I’m so glad to hear that you’re liking your body more and more. Yay!
I googled “How To Make A Dress Form” and all kinds of sites popped up. I chose “Make Your Own Dress Form” on You Tube. It’s a DIY site. Hope this help’s.
It does help. Thanks, Leslie.
you’re welcome.
Thank you Katrina for the body measurements I was struggling to measure myself, where to place the tape measure now I’m able to do it , thanks again
You’re welcome Thembi. Thanks for taking the time to comment.
Great tutorial!! I’ve linked to it over at Craft Gossip:
http://sewing.craftgossip.com/video-tutorial-alter-a-sewing-pattern-to-fit-a-small-waist-and-large-hips/2014/01/27/
–Anne
Thank you, Anne. As always I appreciate it.