 When I started college for fashion design, they wanted us to buy a design toolkit they sold in their bookstore that cost about $200. And of course they made it seem like we couldn’t make patterns or sew without their toolkit. At least the price included the big canvas tote bag to carry all those tools in, right? But as a student who already had to spend money on tuition and textbooks, an extra $200 was not in the budget. Besides, I already owned some of the tools. It wasn’t necessary to buy them again.
Note: Tool kits vary in price, from approximately 80-150 dollars.

Using this list will help you identify the tools you need to create your own custom sewing patterns, so you can avoid blowing your budget on tools you don’t need.
You don’t have to buy a $200 toolkit to start making your own sewing patterns. In fact, if you sew, you probably have most of the tools already. But just in case you don’t, use this list of tools as a guide if you do decide to buy a toolkit. Or use this list to add to the tools you already have.
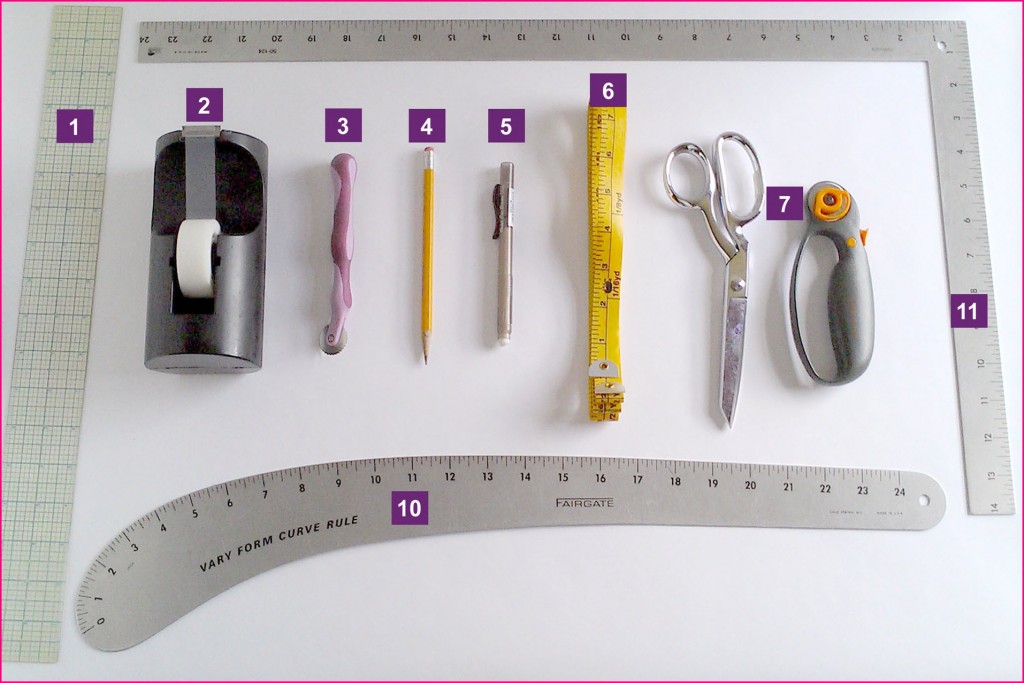
1. 18” C-Thru Ruler
This ruler can be found at any craft or fabric store. You need a c-thru ruler so you can see your lines, especially when drawing perpendicular lines.
2. Tape
When changing the design of your pattern or adding pleats, etc. tape is necessary. I use Scotch Magic Tape only because it’s a little more forgiving when I make a mistake and have to remove the tape. Scotch tape is pricier than others so if you find one cheaper that works just as good, go for it.
3.  Tracing Wheel
This is a great tool for tracing your pattern onto another piece of paper so that you don’t ruin your original. It’s also good for transferring markings from one pattern piece to another.
4. Pencil
Use Pencil so you can easily erase any mistakes. Mechanical pencils are ideal but a regular pencil will do the job and a pack of pencils is cheap, especially during back-to-school sales. Just keep a pencil sharpener close by.
5. Eraser
I like this eraser because it doesn’t rip or tear your paper and it leaves a clean surface with no trace of your erased line. You can find an eraser like this at an office supply store or you can get one without it’s own dispenser.
6. Tape Measure
Use it for the obvious- to take your measurements or your client’s or family member’s measurements. A tape measure can also be used to measure curved areas on your pattern like an armhole or neckline.
7. Scissors or Rotary Cutter
Use either your scissors or rotary cutter for cutting out your pattern. You don’t have to have both. You don’t have to spend a lot of money on scissors for cutting paper. Keep in mind that a rotary cutter requires a cutting mat which can be an additional cost.
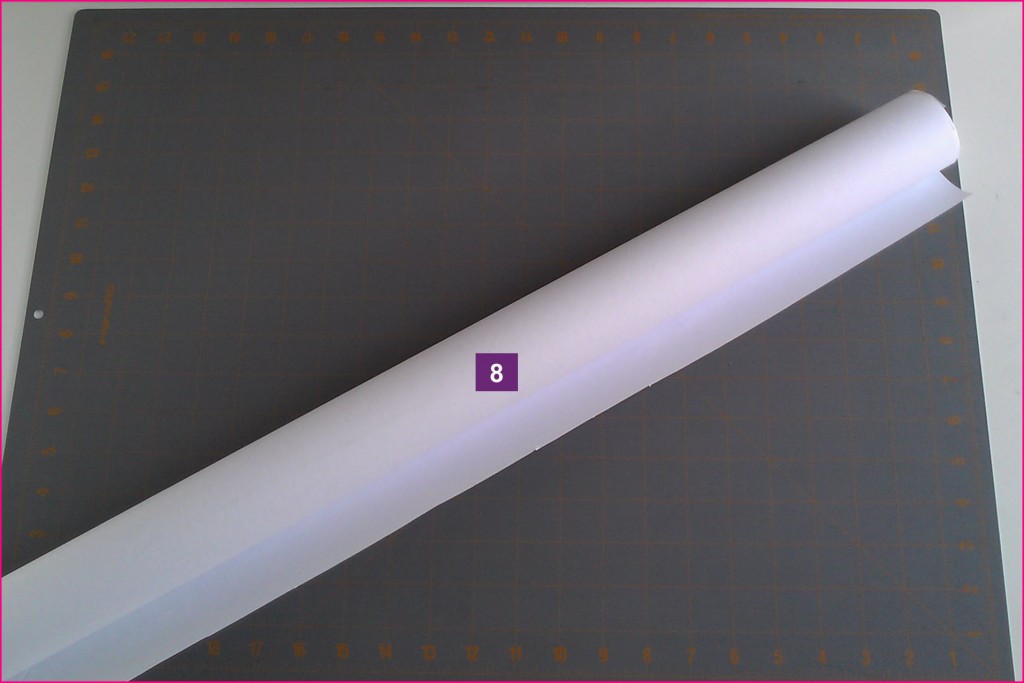
8. Paper
White banner paper roll can be found at office supply stores like Staples and Office Depot. It’s 24-30 inches wide and 65-72 feet long, depending on where you buy it. It’s a nice weight for patterns and costs about $7.
9. French Curve (not pictured)
Both Joann Fabrics and Amazon.com sell French curves and the prices vary. Many of these are packaged in a set of 4 or 8 and are priced at $2 and up. A set of 4 will be more than sufficient for making your patterns and in some cases more than what you’ll use. You can also sign up for Joann Fabrics’ email newsletter and they’ll send you 10-50 percent off coupons and discounts right to your inbox. Hopefully you can find one at a good price in a store near you because buying local gives you the advantage of not having to pay shipping/handling costs.
2 Optional Tools that are Nice to Have
You can buy the optional tools when your budget allows or you can put them on a birthday or Christmas wishlist, hint, hint.
10. Vary Form Curve
This is a great tool to have. It’s made of aluminum so it will last forever. I’ve had mine since 1993. It’s great for armholes, hip curves, or any kind of curve.
11. L-Square
This is perfect for squaring and for drawing perpendicular lines. It’s also made of aluminum so you should never have to buy a new one.
Because prices of individual items can add up fast I encourage you to total the prices for the 9 items listed above, especially if you need them all, to determine if buying individual items or a buying a toolkit is best for your budget.
It’s always good to comparison shop and thanks to the Internet it’s easy to do. I’v listed 2 additional resources below but I’m sure there are others out there. And don’t forget to join the email lists of your favorite craft, fabric and office supply stores to receive coupons and discounts in your inbox.
Have anything you want to add to the list? Tell me in the comments below.
Thanks for your information that helps us make pattern
Upon looking at vary forms, I see different shapes and sizes. How do I choose? Thanks!
Terri, if you want a dress form you can pad to resemble you shape for fittings, then get a form that’s close to your size. One that has similar proportions will probably be hard to find, unless you get it custom made. But having a form you can pad to resemble your size and shape will be an asset for fittings.
You are terrific with explaining — your voice is relaxed and you ease into the learning curve with us. It’s as if you are giving us a treat…. and you are.
Too many sites on dart manipulation complicate rather than simplify.
There is artistry and passion in you. I am happy to have found you.
Thank you so much, Lorna. I really appreciate your kind words.
I’m so glad I was able to simplify dart manipulation for you. That was definitely my goal. I’m also happy to hear my passion for sewing, patternmaking and teaching shows.
Again, thank you for your wonderful comment and for your support.