 Sewing a beautifully handmade garment doesn’t start with the sewing. We know that the fabric we choose has to work with the pattern, or our garment will look homemade from the start. But after you choose the right pattern and fabric, preparing the fabric for cutting needs to take place. Today, I’m going to talk about 3 things you should do to before you cut your fabric. And in this post, I’m referring to woven fabric, not knits.
1. Wash/Dry Clean Before You Cut Your Fabric
Washing your fabric before you cut ensures that shrinkage will happen before you cut out your garment or sewing project.
This is especially important for garments. Imagine spending all that time altering your pattern to fit your curves, making a muslin (or 2) perfecting the fit, sitting at your sewing machine for hours sewing your garment, finishing and wearing your garment, then washing it for the first time and IT SHRINKS!!! The next time you try to wear it, it’s too tight – like no wearing ease in it at all. You have to suck it in, lay on your bed and pray just to get it on. Until you accept that it is now too small.
Pre-washing your fabric could have saved you the heartbreak of only being able to wear your garment once, after putting all that time and energy into creating it.
If your fabric is dry clean only, then it’s important that you take it to a reputable dry cleaner. I try to avoid the “We clean everything for $1.99” places because not only have I heard, but I’ve also seen the damage some of them do to garments. You don’t want a dry cleaner to damage your fabric, even if you haven’t yet put the time in making anything. That’s your money down the drain, especially if they refuse to reimburse you.
I can’t express enough how important this step is. Preparing your fabric before you cut is the first step to ensuring that your garment or sewing project does not look homemade. So make sure you follow the care instructions provided by the manufacturer of your fabric.
Exceptions to cleaning your fabric or using the manufacturer’s care instructions:
- Changing the fabric texture for a creative effect. An example of this is washing wool, which is usually dry cleaned, for a felted look.
- Using fabric that has been pre-shrunk or isn’t in danger of shrinking. For example, I’ve worked with both satin and velvet and neither required dry cleaning before using.
- Using a muslin for fitting purposes only. If you’ve decided you’ll only be wearing your muslin for fittings, no pre-cleaning is necessary.
Some people use a less expensive fashion fabric instead of cotton muslin so that if their muslin fits or requires simple alterations, they’ll have a wearable garment as a result. In this case, depending on the fabric, you may have to pre-clean/shrink it.
Fabric Care Instructions
Fabric care instructions are found on the end of your fabric bolt. I usually take a small notebook with me when I go fabric shopping so I can record the care instructions. Or I take a photo with my cell phone, making sure to get a little of the fabric in the picture so I’ll know which fabric the care instructions belong to.
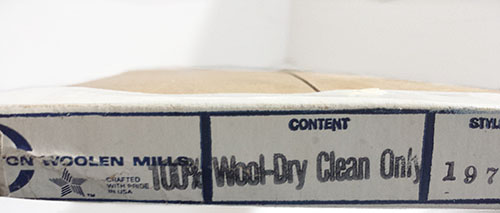
The end of a fabric bolt. Fabric instuctions are sometimes stamped on the bolt end, as in this photo, or printed.
Even if you’re only buying one fabric, don’t try to commit the care instructions to memory. It never hurts to record it in case your memory fails you. (Mine often does.)
Following the care instructions is to your advantage because the manufacturer has given you the best way to care for your fabric so that you will get the most use out of it without it being damaged or looking worn and old after only a couple of washes or dry cleanings.
Fabric Remnants
Every time I go to the fabric store, I never leave without checking the remnant tables for fabric jewels at a sale price. The problem with remnants is they may not be on their original bolt. This means the care instructions (if there are any) may not be for the remnant. Or the remnant may not be on a bolt at all. It may just be folded on the table.
This is also the case at warehouses where the fabric is on a long roll rather than a bolt.
Unless it’s a fabric you’re familiar with, you either have to do a burn test to find out the fiber content, test a 4-6 inch square of it in the wash or dry clean it and hope for the best. The last time I did a burn test on fibers was in college so I don’t remember the process, but I’m sure there is information out there.
Preshrunk Fabric
If the fabric is preshrunk, that information will be on the end of the fabric bolt as well. In that case, there’s no need to wash or dry clean it first.
If your fabric is machine washable and you want to test it to make sure it was preshrunk or if you’ve had it so long you can’t remember if you washed it, cut a 4-6 inch square and wash and dry it with the appropriate load of laundry. Once it’s dry, measure to see if it measures the same or is smaller. If it’s smaller, you know the rest of the fabric needs to be washed.
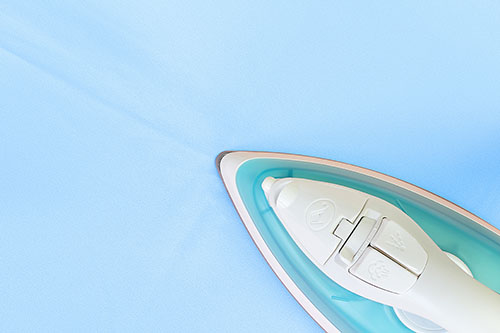
2. Press Your Fabric After Washing
You should never cut wrinkled fabric. It doesn’t matter how much you “hand press” it as you’re laying the pieces. Take the extra time (I know it’s a pain) and you won’t be sorry. Not pressing it can result in things being too short, too long or worse – too small! When sewing, this will cause more headaches than it’s worth.
As a side note, make sure you press your pattern pieces also. They can be pressed on a very low heat without being damaged.
Quick tip: to avoid as many wrinkles as possible, remove your fabric from the washer and dryer immediately after they stop. In most cases, the bad wrinkles happen when the fabric sits in the washer and dryer for a long period of time.
If you’re fabric was dry cleaned, they’ll press it for you. You may have to press out a wrinkle or 2 caused by it being on the hanger.
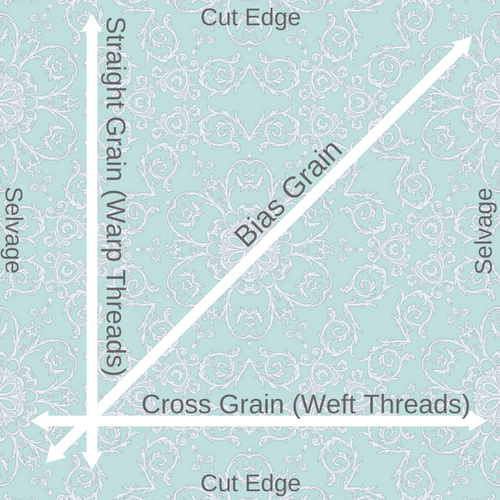
3. Make Sure Your Fabric Is On Grain
Before I get into the fabric grain, let’s look at some of the terminology when it comes to fabric.
Terminology
Here are a few terms you need to familiarize yourself with when it comes to fabric:
Straight Grain: refers to the threads that run the length of the fabric (referred to as warp threads and are the longest threads) and parallel to the selvage.
Cross Grain: refers to the threads that run the width of the fabric (referred to as weft threads and are the shorter threads) and perpendicular to the selvage.
Bias Grain: 45 degree angle to the straight and cross grain. Woven fabric stretches on the bias.
Selvage: the self-finished edge of the fabric, which is done by the manufacturer to stop it from unravelling. Some fabrics have fraying after the self-finished edge, but the self-finished edge keeps the fraying in that area so it doesn’t affect the rest of your fabric. The selvage is on each side of the fabric length when it is unfolded.
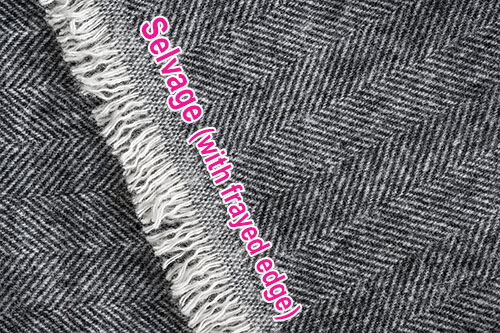
Cut Edge: the edge that was cut to separate your yardage from the rest of the fabric yardage on the bolt. I know this is pretty obvious, but included it just in case.
Now, check out the diagram below to see what the above terminology has to do with your fabric.
Fabric Grain
The fabric grain is important because it determines how your garment should be cut and whether or not your garment will hang correctly on your body after it’s sewn.
Fabric grain is straight when the cross grain is at a right angle to the straight grain.
What does this look like? When your fabric is folded in half lengthwise, selvage to selvage and cut edges matching, there should be no diagonal wrinkles across your fabric. You should also have a lengthwise fold that is straight and lies flat and is not twisted or wrinkled.
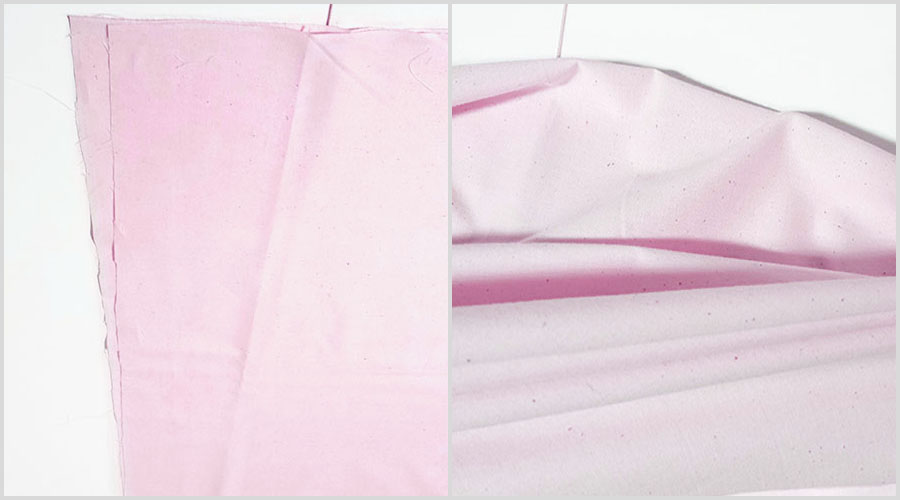
If the only way your fabric lays flat and is wrinkle free is when the cut edges are uneven, then your fabric may be off grain. You can see what I mean in the photo below.
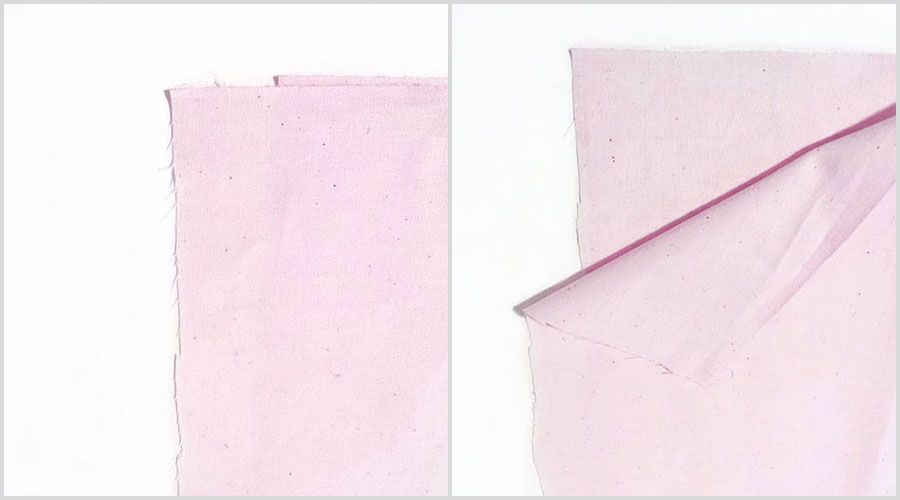
Fabric only lays flat when the cut edges are UNEVEN. You can see the lower layer is shorter than the upper layer at the cut edge (left). When the upper layer is folded back, you can clearly see the how uneven the cut edges are (right).
If I were to fold this fabric selvage to selvage, but with the cut edges together, the fabric would not lay flat but have wrinkles and a twisted fold.
But don’t worry, this can be fixed.
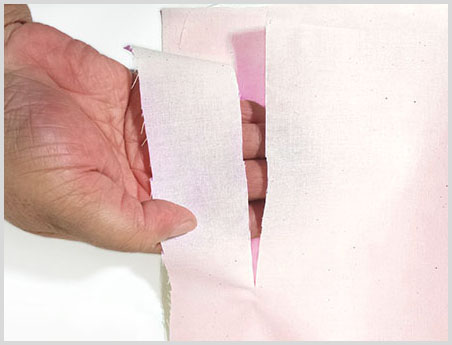
The way you do this is by making a cut a little past the selvage (see above), taking a crosswise thread and pulling it until it gathers the fabric. Your goal is to push the gathers until you reach the other side/selvage of the fabric.
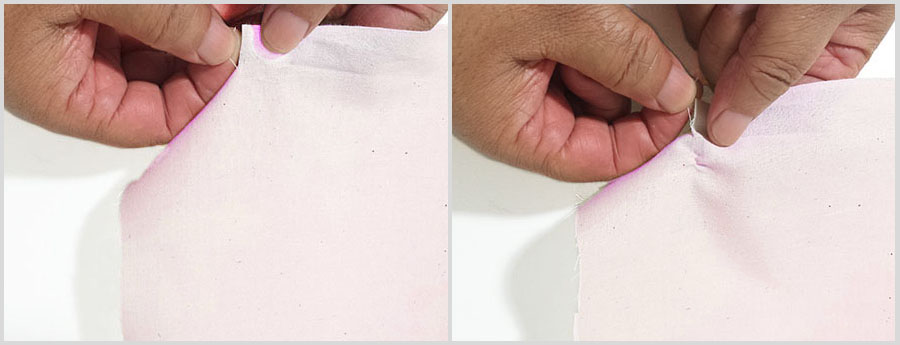
GET YOUR FABRIC ON GRAIN: Cut a little past the selvage and grab a thread (left). Then pull the thread so that the fabric gathers (right).
Continue to push the gathers as far as you can until you get to the other side/selvage or until the thread breaks.
If the thread breaks, smooth out the gathers and cut on the fine line it creates in your fabric. When you get to the end of that fine line, pull a new thread, gather the fabric more and repeat the process.
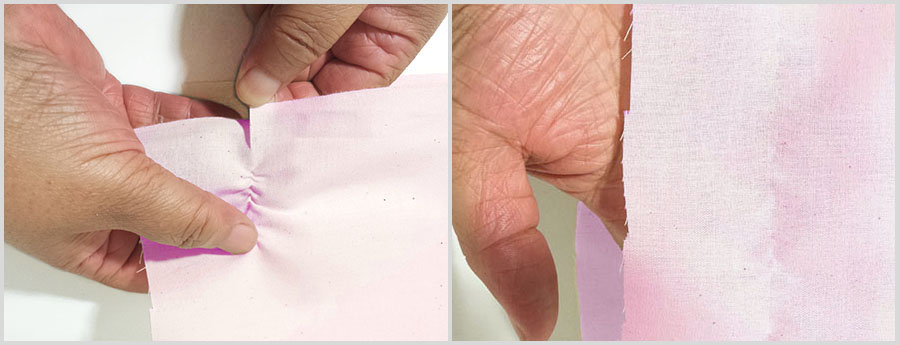
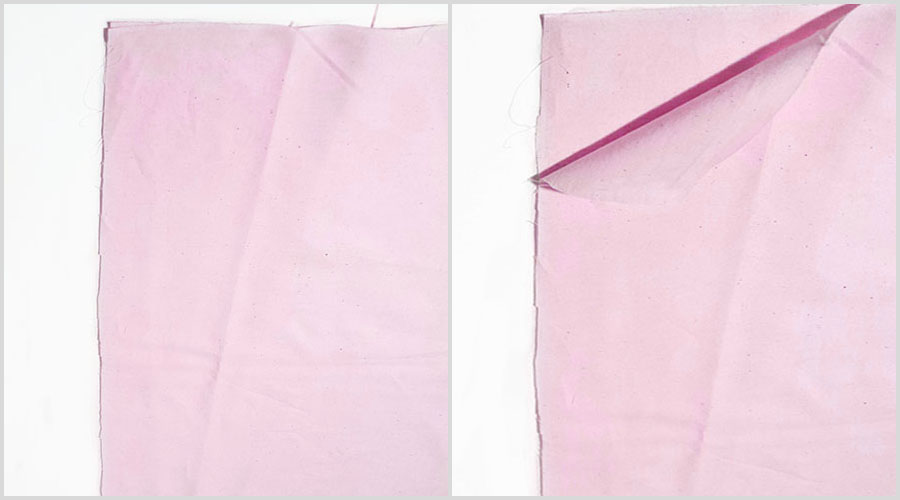
Continue to pull the thread, gathering your fabric and pushing the gathers until you reach the other side/selvage (left). If the thread breaks before you get to the other side, smooth out the gathers (right). This creates a fine line in your fabric (may be hard to see in this photo). Cut on that line until you no longer see it, then grab another thread and continue the process.
This shows my fabric after I cut on the fine line. Now I can pull another thread from the area I cut and continue the thread pulling process. NOTE: if your thread doesn’t break, you can pull the thread and push the gathers until you get to the other side/selvage. Then smooth out the gathers and cut on the line created in the fabric.
Once this is done, fold your fabric matching selvages and cut edges. If it lays smoothly and your cut edges are even, then you’re ready to lay out your pattern and cut.
But if your cut edges are still uneven, like mine below, you can stretch your fabric on the bias grain to correct it.
The cut edges of my fabric are still uneven (left), but better than before. Gently stretching it on the bias grain will help to get the fabric on grain (right).
You can do this solo or you can get someone to help you if you have a lot of yardage. If you have someone helping you, you hold one corner of the fabric and have your helper hold the opposite corner of fabric diagonally across from you and both of you gently pull.
If you’re stretching on the bias solo, grab one end of the fabric and pull on the bias with your other hand.
Lay your fabric matching selvages and cut edges to check the grain again. If needed, continue stretching.
If your fabric is printed, be sure not to stretch it too much or you can stretch your printed design out of shape.
As you can see in the photo below, stretching my fabric did the trick.
My fabric now lays flat when folded selvage to selvage and the cut edges are even (left). When the fabric is folded back, you can see that both layers are even.
When you do these 3 things to prepare your fabric for cutting, you’re getting off to a great start in sewing a garment that doesn’t look homemade.
- Pre-wash or dry clean your fabric
- Press your fabric after cleaning
- Make sure your fabric is on grain
Are there any other things you do to prepare your fabric for cutting? Share in the comments below.
Thanks Katrina, for such a detailed description. I’ve never been professionally taught to sew, but picked it up from my mother who picked it up from my Grandma. She could only see traditional Indian shalwar kamees and her clothes did look homemade. Recently I have become interested in sewing dresses and skirts for my daughters. For a Tutu skirt made with tulle( and lining) what does it mean when it says that the fabric was cut ” the stretchy way” off the bolt?
The fabric might only have stretch in one direction. Or it may have much more stretch in one direction than the other. I’m assuming they mean the fabric was cut with the stretch going across the fabric with the most stretch and not going the length of the fabric, as that would serve no purpose. I hope this helps, Fatima.
Thank you for your valuable post. Just wonder if the fabric is always prewashed in a commercial industry as I’ve heard about using iron steam to prishrink the fabric? Would that be sufficient? And if yes do i need a special iron? My second question is whether clipping edges will preshrink the fabric more evenly. Thanks in advance.
If the fabric is machine washable, I always wash it myself unless the end of the bolt says it’s been preshrunk. Using steam works very well in shrinking wool fabric. I always test a small square of it first just to be cautious. I haven’t used that method on any other type of fabric. You don’t need a special iron, just make sure it’s clean so it won’t spit dirt on your fabric.
I’ve never heard that clipping edges will make your fabric shrink more evenly, but you can certainly try it. It can’t hurt.
What about when the fabric has a pattern printed on it and cutting with regard to the grain or selvage will cut into the pattern in the wrong way destroying the look of the resulting garment.
There are some exceptions to the rules, Amirthakala. You should do what gives you the best outcome for your garment or project. If your fabric has a border print and requires you to cut the pattern on the cross grain, that’s what you should do. Good question. Thanks for asking.
Hello when you say make a.muslin you mean make the dress in material that you will not wear is that right? what type of fabric should I use would it be very thin muslin type material?
Hi Nina, yes, it’s a light weight cotton muslin that’s used to make a test garment to make sure your pattern fits. It’s only used for a test run, not to actually wear. (The test garment is also called a muslin because it’s usually made of cotton muslin fabric.)
You’re not restricted to cotton muslin for testing your garments. I have some old outdated fabric that I bought in the 80’s that not even goodwill would want. I use that for test garments also, especially if I have an old fabric that’s similar in weight to my fashion fabric. It’s just of way of making sure everything fits so you don’t mess up your good fabric.
Thank you for those detailed instructions. I didn’t realize that fabric could still be off grain after you pull the thread across. Glad it’s not just me!
I would love to know your thoughts on whether fabric being so off grain like that is a reflection of the quality of the fabric. Are you concerned when you find this?
You’re welcome, Laura. Pulling the thread gives you the ability to see exactly where your cross grain, or weft thread is. My cut edges, with my fabric folded, were still uneven. This means if I had folded my fabric with my cut edges together, I would have still had folds and ripples in my fabric-which is a sure sign that your fabric is off grain.
When your fabric is folded, you want the cut edges (cross grain) and selvages (the straight grain is parallel to the selvage) to be at right angles to each and everything should lay flat without any ripples or folds across your fabric. Trust me, I sewed for years without knowing this.
When my fabric is off grain it doesn’t concern me unless I CAN’T correct it because that may be a reflection of the quality. But as long as I can correct it, it’s all good.
Great information! I always wondered about pre-washing the fabric. I have 2 projects to start but I don’t have the washing instructions. The fabric is from an upholstery fabric shop so I may dry clean to be on the safe side. I’ll be making short casual jackets so they could be dry cleaned items.
Thanks again..looking forward to more useful information.
You’re welcome, Patti. Dry cleaning your fabric sounds like a good idea. It’s definitely better to be safe than sorry.
Sadly most of the fabric we can buy today is made in foriegn countries. It may be dropped or spread on the floor and handled by workers who are sick. Also, it may be treated with chemicals that are not used in the US because of health concerns. I am allergic to formaldehyde and my dermatologist tells me to wash or dry clean everything before I wear it. Washing may not only remove some dangerous chemicals but also help nudge fabric that has been ironed against the grain back to grain.
Once in a while a fabric doesn’t work after it is washed. It is better to discard your purchase than to put all the time and effort into making a garment and have it turn out to be a disaster.
I forgot about the possibility of dangerous chemicals. Washing before wearing is sound advice. I used to work with fabrics that contained formaldehyde and my doctor suggested I may have developed some health problems because of it. All of this is very important to keep in mind. Thanks for sharing, Penny.