 Sewing pattern instructions have a lot of information in them. I don’t think I ever sit down and just go through the instructions page by page before I sew. But the pattern instructions are there to help you through the sewing process. So even if you, like me, don’t read them word for word, it’s good to familiarize yourself in case you need them. Today, I’m going to show you 10 things in your sewing pattern instructions you need to know.
I’ll be talking about commercial patterns specifically for garments. Keep in mind that pattern instruction information varies by pattern company.
I’ll be using the same McCall’s pattern I used in this post.
Before you buy a sewing pattern
Make sure the sewing pattern has its instructions. I bought a pattern once and didn’t realize the instructions were missing until I got home.
I know you probably wouldn’t mind going back to the fabric store, but save yourself an unnecessary trip.
Wait! What am I saying? All trips to the fabric store are necessary.
Check the number of instruction pages. Most commercial pattern instructions will let you know in the top left corner or somewhere at the top how many pages you should have.
It’ll say Page 1 of 3 or Page 2 of 3, etc., and usually appears beneath the pattern number. You can quickly leaf through the pages to make sure you have all of them.
Make sure the tissue pattern is the right one with the right size range. Take the tissue pattern out of the envelope. Unfold it just enough to see the pattern number on one of the pieces. If it matches the number on the envelope, then it’s all good.
Related Post: 11 Things on Your Sewing Pattern Envelope You Need To Know
There are 10 areas of the sewing pattern instructions that guide you through the garment making process.
These areas can appear in any order in your instructions, depending on the pattern company. The actual sewing instructions are usually last as they can take up 2 or more pages. (Click on the images to enlarge.)
 1. Garment Sketch
There’s a sketch of each garment in the pattern on the first page in the first area of your instructions. They’re small drawings of the front and back of each view. Each view is labeled.
They’re like the style variations on the back of the pattern envelope.
While you’re sewing, you can conveniently refer to the sketches for the view you’re working on instead of searching for the pattern envelope.
2. Pattern Piece Sketch & List
There are sketches and a list of each pattern piece. The sketches are labeled with a number and the garment view or views (A, B, C, etc.). In some cases one pattern piece is used for more than one view.
The pattern pieces are listed by number, name and view directly underneath the sketches.
When you’re looking through the maze of pattern pieces trying to find the ones you need for your garment, the sketches and numbers will let you know what piece you’re looking for.
3. Pattern Markings
You can call this area the pattern markings glossary. It shows a small diagram and gives a definition of the pattern markings, or symbols, you’ll find on any given pattern, but especially the pattern you’re working on.
These aren’t just any markings. These markings, or symbols, give you direction when laying out, marking or sewing your pattern.
The markings in this glossary should never be ignored because you may have to use them at some point in your sewing process.
4. Adjust If Necessary
This area shows you how to lengthen or shorten a sewing pattern. It’s very basic diagrams and written instruction.
Lengthening or shortening a pattern piece is a pretty common adjustment so this area is there in case you need it.
The lengthen and shorten lines are clearly marked on your pattern pieces and should be used if necessary. Some patterns, depending on their design, should not be lengthened or shortened at the hemline of the pattern piece.
5. Cutting & Marking
If you’re a sewing beginner, this area is very important to you because it explains things you need to know before you cut your garment.
It tells you what to do before cutting your garment, like shrinking and circling your layout for the view, size and width of fabric you’ll be using.
Why would these two things be important?
Pre-shrinking your fabric (or dry cleaning if it’s dry clean only) by washing and pressing will get the shrinkage out before you cut your garment.
Shrinkage after your garment is cut and sewn could cause it to be extremely tight and cause it to no longer fit.
You’ll be able to easily identify your layout if you circle it. Layouts look alike. Accidentally use the wrong layout and you could run out of fabric or cut something the wrong way. Either way it will cost you to get more fabric.
This area also explains other things like double thickness of fabric with and without a fold, single thickness, cutting and marking the pattern.
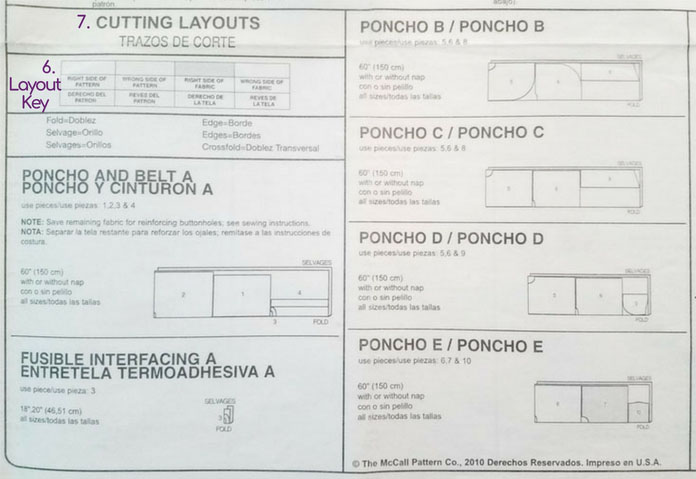
 6. Cutting Layouts Key
The cutting layout key tells you if you’re pattern piece should be on the right side or wrong side when you lay it on the fabric. It also tells you the right side and the wrong side of the fabric in the layout section.
For example, a pattern piece cut on the right side is just white. But the pattern piece cut with the wrong side up has a small dotted pattern on it to let you know to place the right side of the pattern piece face down on the fabric.
You also have to be aware of what’s happening with the fabric. In this case, the light gray on the fabric means that’s the right side of the fabric. But the plain white means that’s the wrong side of the fabric.
This could get confusing while sewing so be sure to refer to the Cutting & Marking section whenever you need to.
7. Cutting Layouts
Cutting layouts are listed by:
- View, (the style of the garment you’re making)
- Fabric width, (the width of the fabric you’re using)
- Size, (the pattern size you’re using)
- With or without nap
With nap fabrics are fabrics like velvet, corduroy or satin. If you hold these fabrics one way, they have a rich color. If you hold them from the other end, they have a lighter, less rich version of the same color.
You can choose if you like the rich or the lighter version of the color, but all your pattern pieces have to lay in one direction so that every piece will be one color and not look like two different colors.
Without nap fabrics are fabrics like denim, crepe or wool. No matter which way you hold the fabric, it looks the same. You can lay out your pattern pieces in both directions and they will all look the same.
The cutting layouts look so much alike and it’s easy to mistake one for another, which is why it’s so important to circle the layout you’re using.
Once you find the right layout for the view you’re using, it’ll tell you the pattern pieces you need by number. Remember you can refer to the list under the garment sketches we talked about in #1.
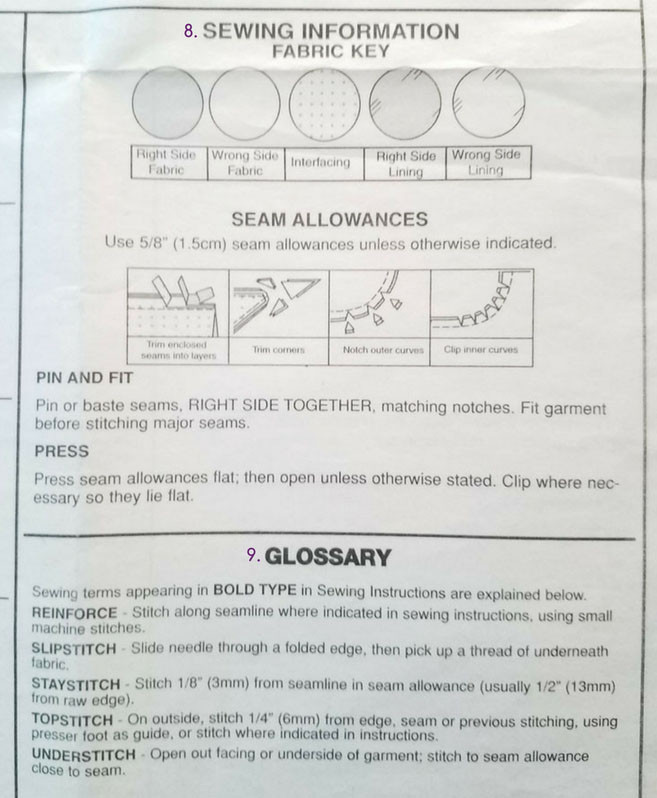
 8. Sewing Information Fabric Key
This key is different from the Cutting Layouts Key (#6). The Cutting Layouts Key is used during the layout and cutting of your garment. The Sewing Information Key is used when you’re sewing the garment.
When you’re reading your sewing instructions, sometimes you’ll notice the drawing of the fabric is a light grey, sometimes it’s white, etc. They’re showing you different sides of the fabric or different fabrics altogether.
This key is pretty universal among pattern companies. But make sure you refer to your pattern’s fabric key to be sure.
Under the Sewing Information Key you may also find a Seam Allowances Key, which is a set of diagrams on how to trim different types of seam allowances.
9. Glossary
There is a Glossary of some of the terms you’ll find in your sewing instructions. They refer to a technique or specific stitch.
The Glossary briefly explains the term and how to do it, but don’t expect it to give you detailed information.
10. Sewing Instructions (Not pictured)
Your sewing instructions will show you how to sew your garment. The drawings and written instructions are there to help you with each sewing step.
It’s never a bad thing to look through your Sewing Instructions before you start sewing. You don’t have to read them word for word, just get an idea of what’s involved in the making of your garment.
Don’t stress if you come across something you don’t quite understand. When you’re sewing the garment, the previous steps may help you to undertstand.
If the instruction sheets seemed complicated to you before, I hope this post explains them in an understandable way.
Hello, My pattern says to use 5/8″ seam allowance unless otherwise stated. So step 1. is very clear. It says “Sew piece (1) and (2) together using 3/8″ seam allowance.” Step 2 says “Stitch back side (4) sections to back (3) in a 3/8” seam allowance. Press seams toward back sides. Stitch center back seam. Stitch front to back at shoulder and side seams.
Step 3, On outside….
My question is the last 2 sentences of Step 2. What seam allowance to I use to I sew “Stitch center back seam. Stitch front to back at shoulder and side seams.”? I’m detail oriented and if I follow these to a “T”, I’m thinking I do this in 5/8″ because it’s not specified otherwise, even though it’s still part of step 2. Any thoughts?
Fran, What’s on your actual pattern pieces. Is it listed on the pattern piece itself where you’re to use 3/8″ seam allowances? If not, if the directions don’t specifically say to use a 3/8″ seam allowance, I would use a 5/8″ seam allowance.
I recently purchased a New Look Pattern numbe 6803 and have unfortunately lost part of the instruction leaflet that comes with the pattern. It is page 3 and 4. When cutting out the dress I saw that it requires me to cut out 4 pocket pieces.
This I have done and I have sewn the dress together, but now I am stuck as to why they have requested why I need 4 pockets and how do I sew them onto the dress. it is a cap sleeve and has little space for a hem. Do I sew two sleeves and two sleeves together to for the hem at the bottom and then attach both sleeves round the armhole.
I a hoping that you can assist me to get the dress finished off. Your help will be much appreciated.
Thanks
MARY NORTHWOOD
You’re exactly right, Mary. The cap sleeves are sewn together at the hem and treated as one piece at the armhole.
Hi Maryann,
It is NOT a must to trace traditional paper patterns. To suggest this additional unnecessary task isn’t fair to someone learning to sew and needing things as clear and as close to an easy complete as possible. Once in a while there may be a reason but it’s rare, especially if you can pick up another for a dollar much of the time in the US. Also, saying that tracing is a must but you never do it could be rather confusing to a new sewist.
Regards,
Barbara Harris
Hi Barbara, maybe you left this comment on the wrong post, as there is no Maryann who left a comment on this post. That being said, I trace my patterns because I know I’ll have to make some type of alteration and I don’t want to mess up my original. The only time I’ve purchased a $1 pattern is if it was on sale, which is not the norm, and I’m in the U.S. Even if the pattern is a dollar, the gas I have to use to drive 25 minutes to the fabric store is saved just by keeping my original and making all changes to a copy.
Sorry I meant to write 4 sleeve pieces which I have cut. It is a little cap sleeve and I am not sure why it calls for four sleeves. Do I sew the hems of the sleeves on the wrong side, turn it to the right side and press it, then sew both pieces round the armhole as you normally would?
I hopemy query is clearer?
Thanks
Mary Northwood
Yes, Mary. That will give your cap sleeve a nice clean finish at the hem.
Thanks for this really informative article. I didn’t used to read all instructions. I’ve learned through trial and error that it pays to read ALL the info.
Yes it does, Sandy. There was a time I didn’t read the instructions either. I could’ve saved myself a lot of headaches.
I read the entire instruction packet like a Manuel before starting. Then I pin them on a cork board in back of my machines. Even if making a garment for the dozenth time, this keeps me from making stupid mistakes and maintain uniformity especially when making duplicates such as bridesmaid dresses
I use the instructions every time as well. You are so right about how they prevent stupid mistakes when making duplicates.
I love the cork board in back of the machine. I neeed to get one. I could also see myself pinning notions like zippers and buttons (on their card) on the cork board for the project I’m working on so I won’t misplace them during the sewing process.
Thanks for sharing, Beth.