 Understanding the envelope of a sewing pattern is an important part of buying the right pattern. From the clothing design on the front of the pattern envelope to its yardage requirements on the back, each section of information is there to guide you in your purchase. Today, I’m going to talk about 11 things on your sewing pattern envelope you need to know. This will help you make an informed decision about whether a particular pattern is right for you in style, size, and skill level.
I’ll be talking about commercial patterns specifically for garments. Keep in mind that pattern envelope information varies by pattern company.
There are 11 areas of the sewing pattern envelope that will help you when buying your pattern.
First, let’s start with the front of the pattern envelope:
Note: The sewing pattern envelope has standard information about the pattern on the front and back. The placement of this information varies by brand. You can see two examples below.
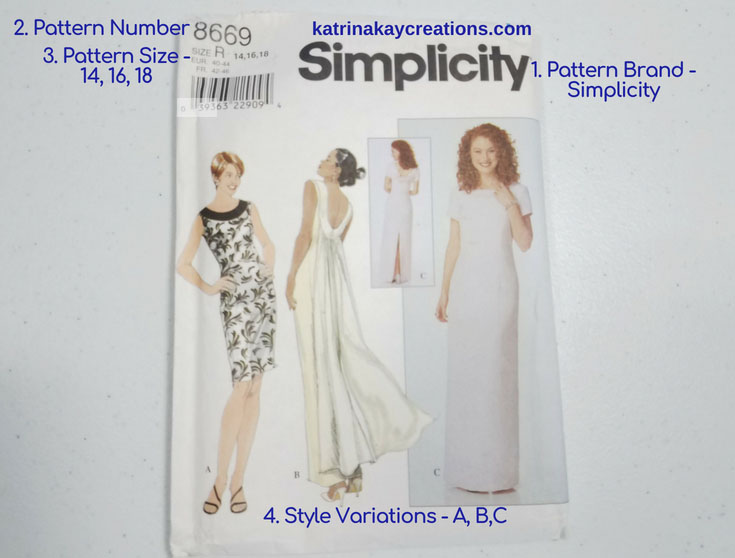
This pattern has 3 style variations, labeled A, B, and C. The difference between A and B: B is longer and has a back drape. The difference between B and C: C has sleeves and fabric roses on the back.
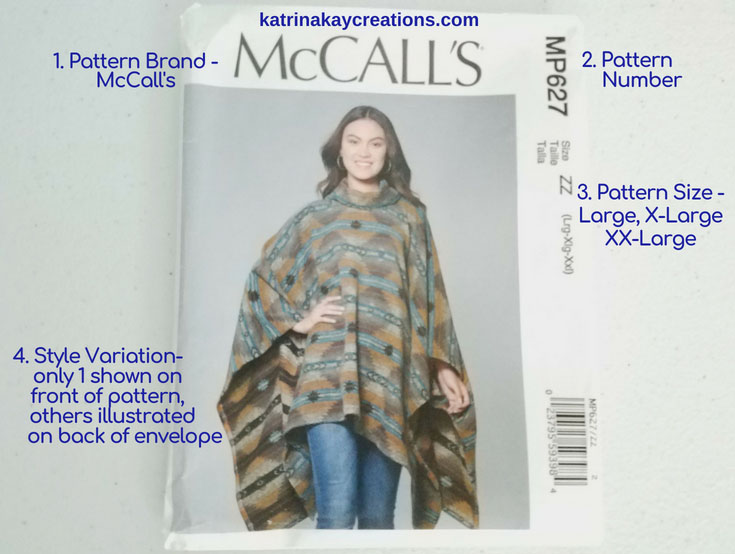
This Pattern has 5 style variations, labeled A, B, C, D and E. Only one style appears on the front of the sewing pattern envelope. The pattern brand name, number and sizes are standard information on the front of the pattern envelope.
1. Pattern Brand
The most well known brands that sell sewing patterns are what is commonly called the “big 4” companies. These companines are McCalls, Vogue, Butterick and Simplicity.
And just for your information, The parent company (CSS Industries, Inc.) of McCall Pattern Company owns Vogue, Butterick and of course McCall’s Patterns. CSS Industries, Inc. also acquired Simplicity Creative Group in 2017.
In fabric stores each brand has its own section in the file drawers where they’re kept.
As you sew more and more, you may find that you prefer one pattern brand over another. You may like the fit of one brand better than the rest or find one’s sewing instructions easier to follow than the other.
You may also prefer the price point of one over the other. Vogue patterns are usually more high end in price. They also have patterns designed by well know fashion designers. McCall’s, Butterick and Simplicity are similar in price range.
I usually wait for sales to buy patterns from the big 4 pattern companies. I’d rather spend the bulk of my money on fabric. :).
Thanks to the Internet, you also have access to independent pattern companies, also referred to as indie patterns. These patterns are both paper patterns and downloadable .PDF patterns with no connection to the big 4 pattern companies.
In fact, indie pattern companies usually fill a void in the sewing pattern market, which can be seen in design and size range.
2. Pattern Number
The pattern number is usually in the top left or right corner of the pattern, depending on the company. This is a number given by the pattern company so the pattern can be easily identified.
Many of the indie pattern companies identify their patterns by name instead of number.
In fabric stores the pattern number is used to find a specific pattern among many. It serves as a reference so that you can quickly find the exact pattern you’re looking for by brand name, number/name and size.
3. Pattern Size
The sizes listed under the pattern number are actual sizes inside that particular envelope. There are some patterns that have the entire size range in one envelope. But there are other patterns that have only 1-3 sizes in one envelope. Pay careful attention to these numbers to make sure you are buying the correct size range.
I personally prefer patterns that have multiple sizes in one pattern envelope. If our body changes and we go up or down a size, we can just choose that new size on our pattern instead of purchasing a new pattern in a different size.
Patterns with multiple sizes in one sewing pattern envelope also make doing alterations a little easier because we can go up or down to the next size if we need to add or subtract from a specific area of the pattern.
The size(s) of the pattern is listed under or next to the pattern name or pattern number.
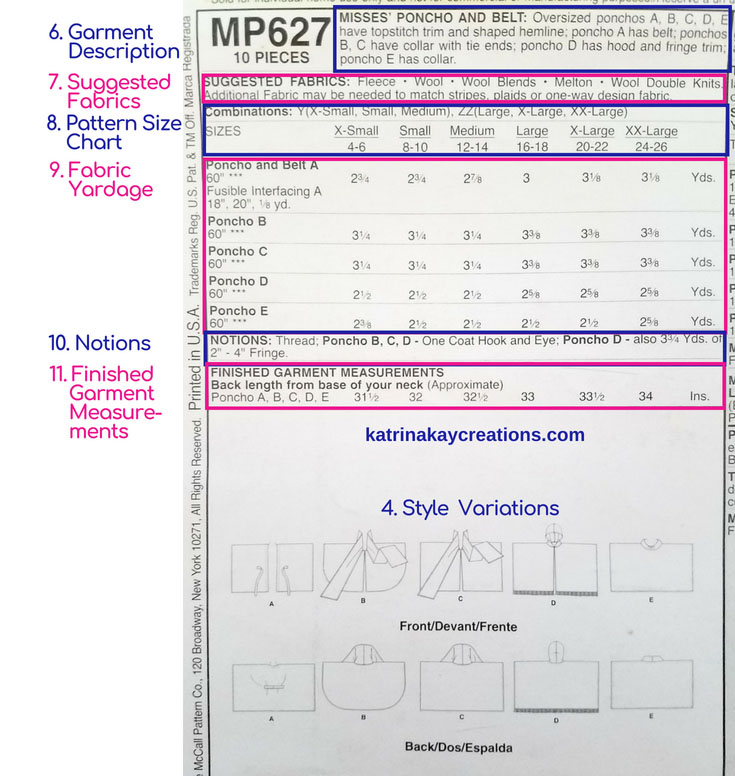
4. Garment Style & Variations
In order to know exactly what pattern style you’re getting, a picture or drawing of the finished garment on a model is on the front of the pattern envelope.
There are times when an outfit is pictured but one of the items is not actually included in the pattern. Usually a small note is used to let you know this and it will say something like, “Blouse not included”.
When the style is offered in different options, like long sleeved and short sleeved or with and without a collar, each option or view is given a letter. This letter will help you in choosing the right yardage, the right layout on the fabric and the right construction instructions to follow.
5. Level of Difficulty (Not Pictured)
Many pattern companies will list somewhere on the sewing pattern envelope if it’s for beginners, intermediates or the more advanced.
You should always buy a sewing pattern that fits your skill level. Otherwise you may end up with a collection of unused patterns or failed projects.
In some cases you can tell by the style of the garment how easy or difficult a garment is.
If the level of difficulty isn’t listed and you can’t tell by the style on the front of the sewing pattern envelope, take a quick look at the pattern’s line drawings and sewing instructions.
If the instructions look too challenging or you find them too complicated to understand, you may want to choose a different pattern.
You can also read the garment description on the back of the pattern to determine if the garment style fits your skill level.
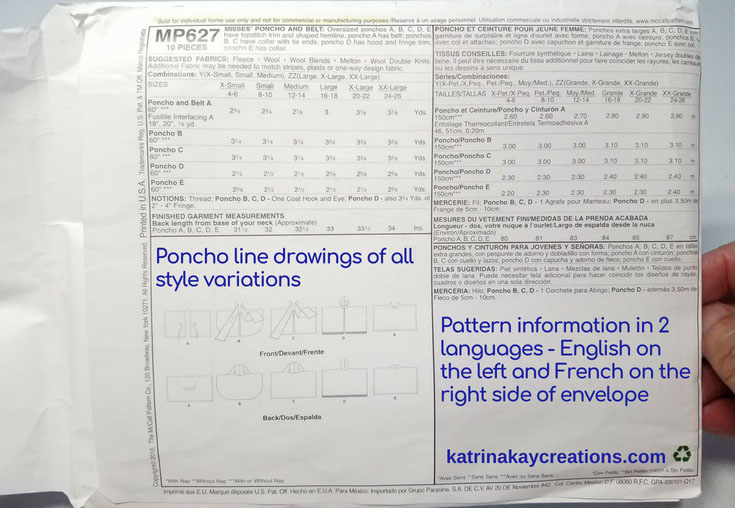
Next, let’s look at the back of the pattern envelope. For this example I’ll only be using the McCall’s pattern.
Note: Again, the placement of this information varies by brand.
6. Garment Description
Commercial pattern companies describe the garment(s) on the back of the sewing pattern envelope. That’s not to say that other companies don’t, just that commercial pattern companies are pretty standard in the way they list information about the pattern.
The description tells you things like, the garment is lined or fitted, semi-fitted or loose fitting. These are the inside details that don’t show in the pictures or drawings of the pattern. The description also helps you decide if the pattern is a good fit for your skill level.
7. Suggested Fabrics
The fabrics listed on the back of your pattern give you an idea of what type of fabric works best for that particular garment.
You don’t have to stick strictly to this list of fabrics. If you choose to do something not listed, make sure your chosen fabric has some of the same qualities (weight, drapeability, woven, etc.) as what the pattern suggests. For example, you wouldn’t want to choose a knit fabric when the pattern calls for a woven fabric.
The pattern envelope also tells you if your pattern is suitable for fabric with nap (which are fabrics like velvet or satin in which all pattern pieces have to lay in the same direction), or without nap (which are fabrics like cotton or wool in which pattern pieces can lay in both directions).
8. Pattern Size Chart
I hope you haven’t freaked out about how different pattern sizing is from ready-to- wear sizing. Don’t worry; the sizing is based on two different measurement standards. So when choosing a pattern size, forget about what size you wear in ready-to-wear.
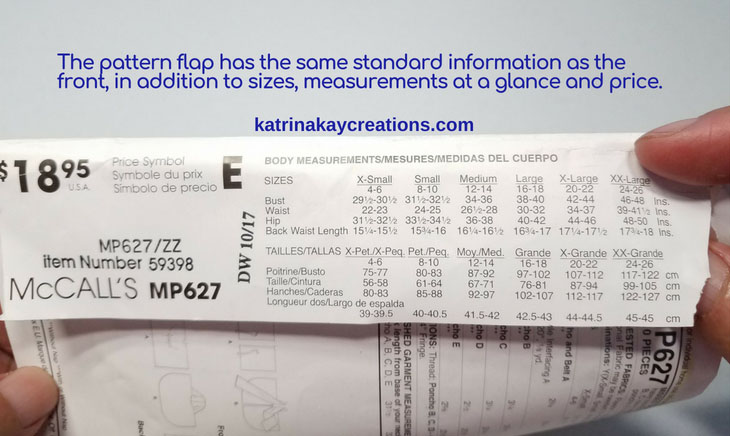
What you really want to pay attention to when buying a pattern is the bust, waist and hip measurements. Some pattern companies put those measurements on the pattern flap so you can see them at a glance.
The bust, waist and hip measurements are there to help you to choose the pattern in the right size. They serve as a guide in your pattern selection.
For tops, jackets & dresses, I was taught to choose the pattern based on your bust measurement. The reason for this is because the bust is more difficult to alter than the waist or hip.
For pants and skirts I use the waist measurement because it’s more difficult to alter than the hip if there are darts or pleats at the waist.
Related Post: How to Calculate Wearing Ease For a Better Fitting Plus Size Pattern
9. Fabric Yardage
The fabric yardage required for each garment in the pattern is listed for each size. The yardage amounts are shown for fabric that is 45 inches wide and 60 inches wide. Wider fabric requires less yardage.
When buying your fabric, you can find the fabric width on the end of the fabric bolt. You can also find fiber content and fabric care instructions.
It’s not a bad idea to buy a little extra yardage to allow for shrinkage and/or mistakes. I usually buy a half yard to a yard extra, especially if my fabric is a little less than 45 or 60 inches wide.
10. Notions
The pattern envelope lists the notions, or supplies, needed to complete each garment in the pattern. They can be the things you can’t see in the picture, like shoulder pads. Or they can be things you can see, like buttons. It tells you things like:
- How much of these supplies or notions you need
- How wide they should be
- What size the notions should be
- What pattern view the notions are used for
- How many of the notions you need
- And other details based on the kind of garment in the pattern
The notions list includes all the things that are needed to sew the garment and add the finishing touches to the garment.
Because there’s limited room on the pattern envelope, you’ll find interfacing yardage information, lining yardage information, finished widths, finished lengths and fabric layout information on one of the instruction sheets inside the pattern.
11. Finished Garment Measurements
The finished garment measurements for this McCall’s pattern refers to the “back length from base of your neck” to the finished hem of the garment. This measurement will help you if you want to know approximately where the finished length of the garment, in this case a poncho, will fall on your body.
I hope this helps you understand the information on your sewing pattern envelope.
Even when you buy a pattern online, make sure you find the 11 points mentioned in this blog post.
Commercial pattern companies will include the same information online that’s on the pattern envelope. Indie pattern companies should give you enough information to make an educated pattern purchase.
Great info Kay. Have just started sewing apparel again after many years. Have been making quilts. Feel like a beginner again as I am not the size I was when I last sewed! Lol!!!! Vind the difviculty in tnhat my bust is not in propodtion to my lower half…..made a simple dress to my bust which was 4″ too big allover! Going to try again…..☺ Jilly
My bust is not in proportion to my lower half either and that offers fitting challenges. Keep trying and I’m so glad you’re sewing apparel. Thanks for reading.
Thank you for accepting me into the group. I am very excited about what lies ahead for me and my future sewing projects.
Welcome, Arlene! I’m so glad to have you as part of our community.
Thank you for this information. I have a better appreciation for commercial patterns and when I need to, I can buy with confidence.
I’m glad to hear that, Judith. You’re very welcome.
Thanks for taking the time to comment.
Thank you so much for the information you have provided, it is very valuable. I find the instructions on some patterns to be vague or lacking in clarity.
You’re welcome, Sandra. Trying to decipher the pattern envelope information was overwhelming when I started sewing, so I’m glad to help.
Thanks for reading and taking the time to comment.